Leaderboard
Popular Content
Showing content with the highest reputation since 12/27/25 in all areas
-
HexOS Gets a Major Upgrade This release introduces an improved Apps experience, new apps, two-factor authentication support, improved GPU support, and Goldeye compatibility. Read more about it on our docsite here at Command Deck Update - December 26, 2025 Also check out our latest blog for even more details! NOTE: This update was applied automatically. You may need to clear your cache.6 points
-
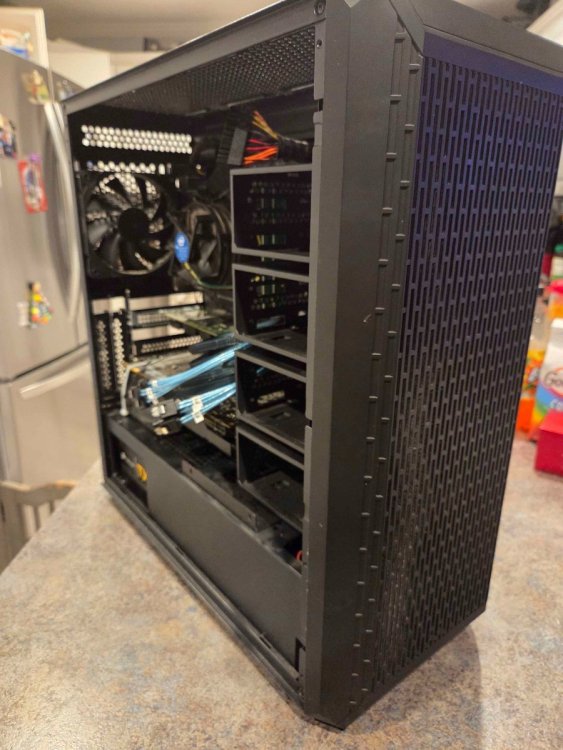
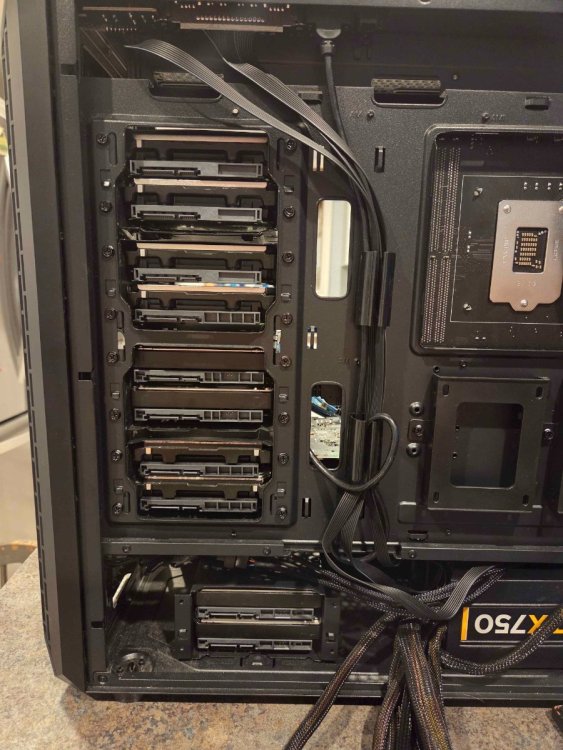
So after some digging, poking and planning I have NAS 2.0. Unlike my first nas that was built off of pure storage round 2 is planned on the fact that I have found a better way for my use case to use hexos. So moving to a newer cpu platform will give me more horsepower down the road swapping from a i3 8350k to an i7 10700. Moving to storage I will have 3 128g ssd as pool 1 for all my apps and vms. Next to that is 4 12tb drives that will be the main pool for storage. Setting up the next 6 8tb drives will be my once a month storage point "the drives will be spun down when not in use". As far as my old setup it will be getting 15 8tb hdds and will be colocated for in case things happen at home storage.4 points
-
Let's Talk About Immich If you've been running Immich on HexOS this year, you know it hasn't been smooth sailing exactly. We want to talk about what's happened, why it was so challenging, and how we're working to handle these situations better in the future. What Happened? Earlier this year, Immich deprecated their old storage configuration and required all users to migrate to a new structure. For users running Immich through docker-compose or other manual setups, this meant updating some configuration files and running a few commands. Annoying, but manageable. For some HexOS users, the migration was more involved. Because of how TrueNAS SCALE structures application storage, moving to the new configuration required either reinstalling Immich fresh (the simplest solution) or manually migrating existing data between datasets (a process that involved SSH access, rsync commands, and careful attention to permissions). But if you're choosing between "reinstall the app" or "follow a 15-step guide," neither option feels great when you chose HexOS specifically to avoid that kind of complexity. Why Was This So Hard? When Immich made this change, we had a choice to make. We could have built a comprehensive rsync-based migration tool using the TrueNAS API. It has those capabilities. But that would have meant dropping everything else we were working on to build what amounts to using a cannon to kill a mosquito: a massive, complex solution for what we hope won't be a regularly recurring problem with this particular app. Instead, our community stepped up in a huge way. Users like @forsaken and @G-M0N3Y-2503 created detailed guides (to move or rsync your data). These guides walked through the manual migration process to preserve existing data in Immich. They focused on helping users through the immediate problem, while we continue building the platform we need to handle situations like this properly. That platform is HexOS Local: a locally-hosted management application that will let us perform complex operations without being bottlenecked by the engineering overhead of building one-off solutions through the SCALE API every time an application throws us a curveball. This reduces the technical burden on our team and, more importantly, gives us the flexibility to automate maintenance tasks that previously would have required manual intervention or massive engineering investments. This same platform will serve the Local UI/UX feature we've committed to delivering as part of our 1.0 release. We'll be talking a lot more about HexOS Local in an upcoming blog post, but the key takeaway is this: we're building HexOS to handle whatever the open-source ecosystem throws at it, without having to choose between "drop everything and build a custom tool" or "make users SSH into their servers." What About Right Now? If you're currently running Immich on the old storage configuration and haven't migrated yet, you have options: The simple path: Reinstall Immich fresh with the new configuration. Your photos will need to be re-uploaded, but the setup is clean and straightforward. The preservation path: Follow one of the community migration guides to keep your existing data in place. These guides are more technical and require command-line access, but they work. Our recommendation depends on your situation. If you have a manageable photo library and good backups, the fresh install is probably your best bet. If you have years of photos, carefully organized albums, and user configurations you don't want to recreate, the migration guides are there for you. And if this seems to daunting, email support@hexos.com so we can schedule a time to assist you directly. Moving Forward The Immich situation showed us exactly where we need to invest engineering effort. We can't keep facing the choice between building massive one-off solutions or asking users to break out the terminal. That's not sustainable, and it's not the HexOS we're building. Immich is an incredible project. It's exactly the kind of self-hosted solution we want to make accessible to everyone. The team behind it recently released v2.0, marking their stable release with better upgrade paths going forward. We're committed to making sure that when the next complex maintenance task comes up, whether it's Immich or any other application, we have the infrastructure in place to handle it gracefully. That's the HexOS we're building. Thanks for your patience while we get there.4 points
-
So I noticed that HexOS requires encryption at the folder-creation stage for future offsite backups. Since Buddy Backup isn't out yet, how will the migration path look for users who have already populated large unencrypted datasets? Specifically: Will there be a built-in 'Migrate to Encrypted' tool to move data into a new encrypted dataset for Buddy Backup? Will Buddy Backup support 'Replication-level encryption' (encrypting the stream during transit/at rest on the destination) without requiring the source folder on my local NAS to be encrypted? What about application data folders that are already not encrypted, how would those be handled?3 points
-
This is a bit more of a loaded question than you'd expect. We do support usb DAS* we do not recommend using usb external storage and there is higher risk of things going wrong. Also it very much depends on the DAS hardware as well. As a cost cutting measure instead of passing through the HDD/SSD serial number many just tell the connected computer the same generic serial number for all the drives. Those enclosures do not work properly with HexOS. HexOS needs the DAS or enclosure to pass through unique serial numbers for each drive. If the DAS does provide the unique serial number for each drive the enclosure will work.3 points
-
Hi, very nice update, here are some points of feedback: On the Immich app, it showed the button "An updated configuration is available for this app", which I clicked. Afterwards, my Immich instance wouldn't start up again. I looked into it on the truenas interface where the server container wouldn't start but instead display long error messages before crashing. I noticed that the data storage path was moved from "Host Path" to ixVolume. After I changed it back to the original path, everything worked again. If the switch to an ixVolume is intended, I'd like to have the option (in HexOS) to choose a host path instead, as I want to be able to access my photos via the smb share from another pc. I guess, my trouble with the immich app could have been avoided, if the update notification in the HexOS interface showed the changes clearly, instead of the generic "This will reset every change you made in TrueNAS" message that pops up right now. Also, I installed Nextcloud before it was curated on HexOS, so now I would be interested in migrating my installation to the curated version (without uninstalling and re-installing the app). I tried using the configuration update button, which (expectedly) did not do anything.3 points
-
When user clicks a notification for an App Update and the slide-in panel shows on the right of the page, it would make sense to have a link in the Notification to the App which requires an update. Today I have to navigate to the App listings and then into Installed Apps. But even *then* I don't have any indication which app requires an update. I have to click on each of them to find out which App requires an update. Am I missing something which indicates the app requiring update?2 points
-
2 points
-
Hello, It seems the after the update some systems on reboot are reaching out to our server so it doesn't know your there. Try the following. Login to TrueNAS interface. Left side select "system". Then after screen refreshes select "shell" from the list. Paste in the following command. Can't use normal short cuts Will need to use Shift + Insert Key for pasting. sudo python /usr/lib/python3/dist-packages/middlewared/scripts/vendor_service.py If that works within about 1 min you should be able to go to deck.hexos.com and see your server or claim it.2 points
-
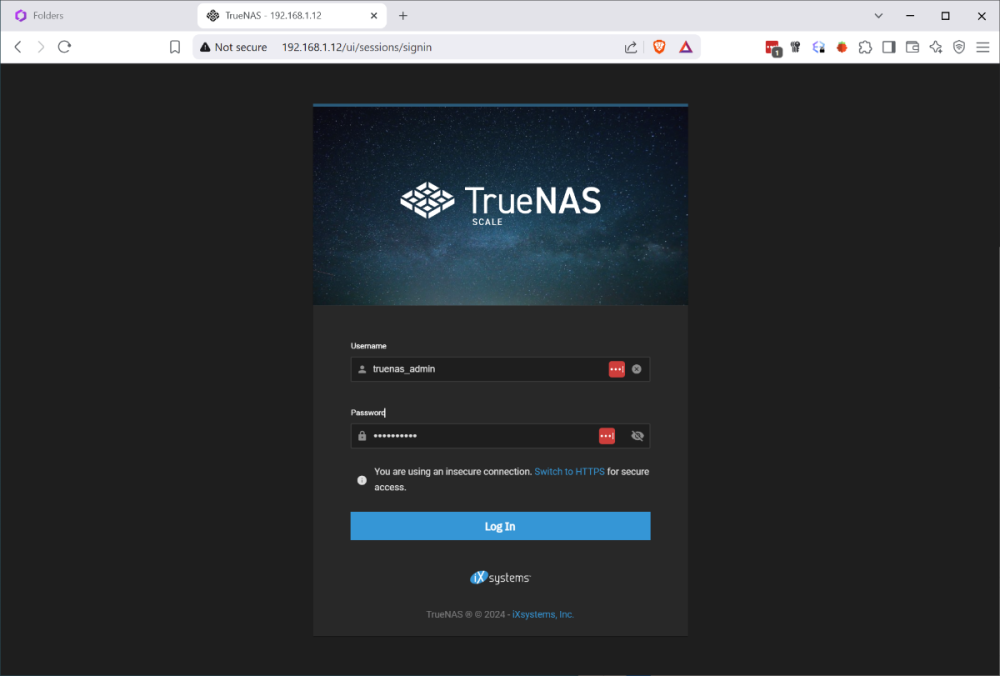
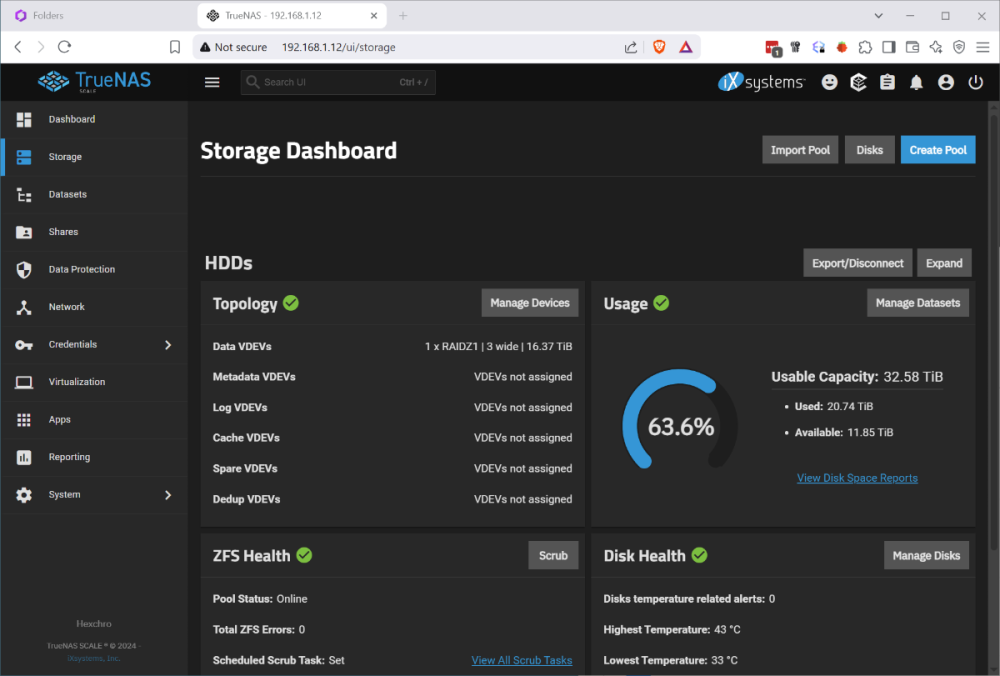
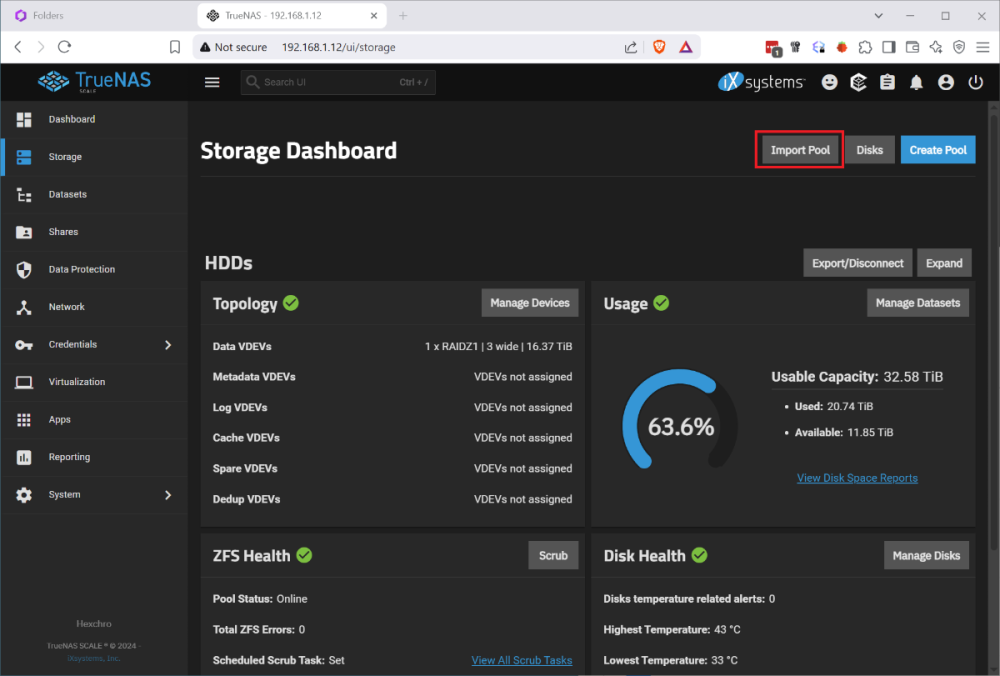
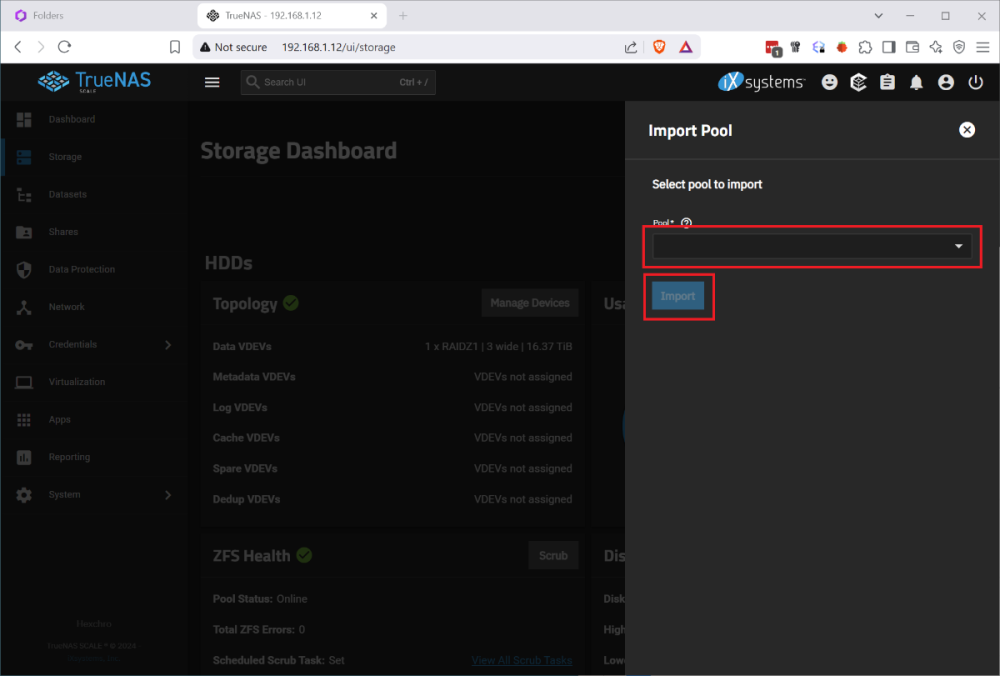
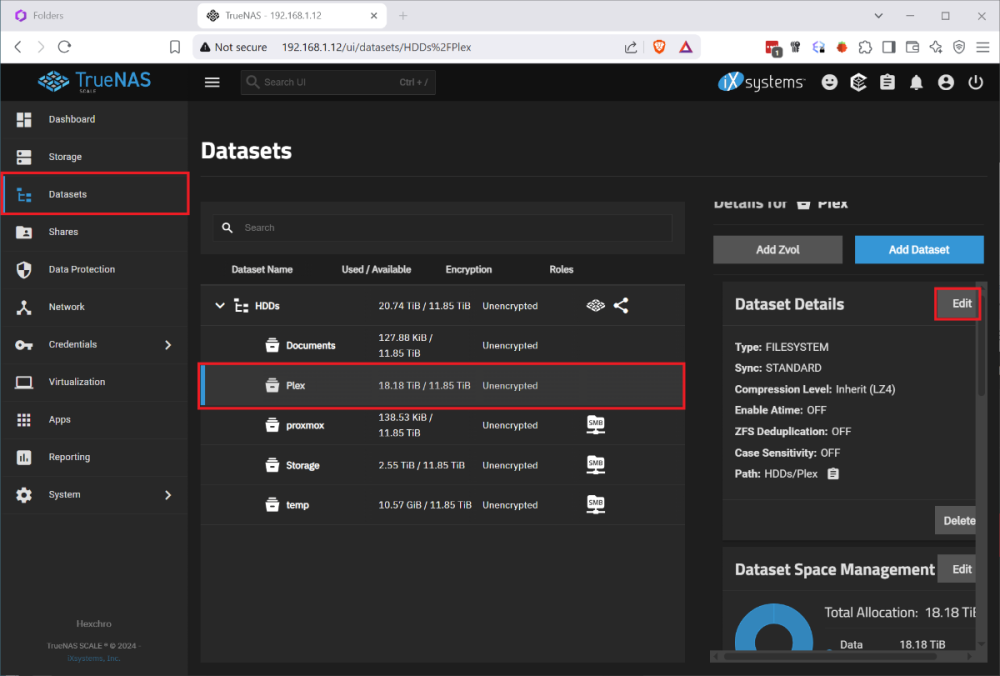
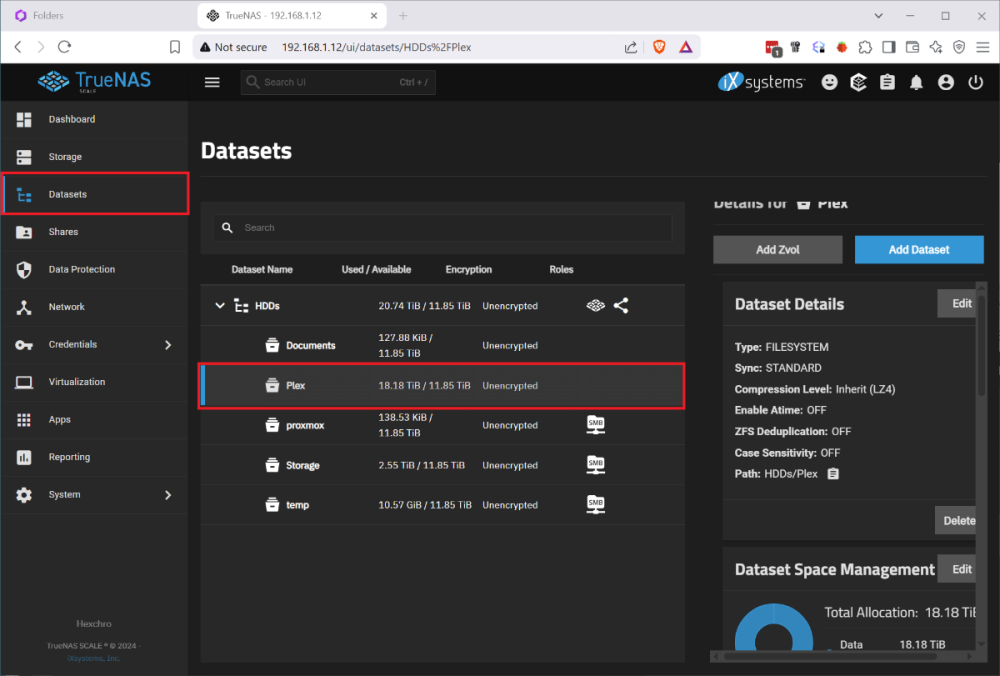
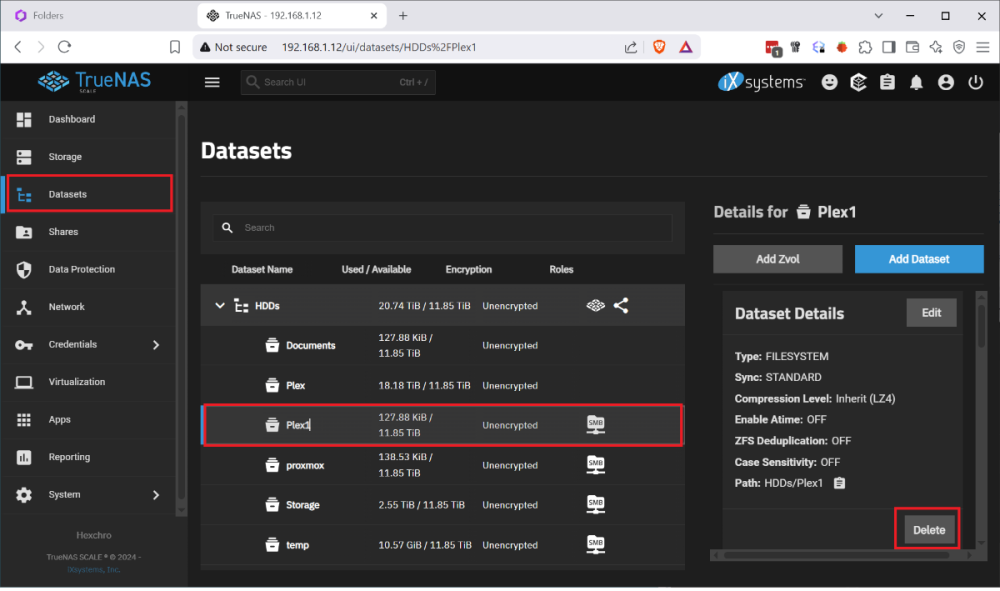
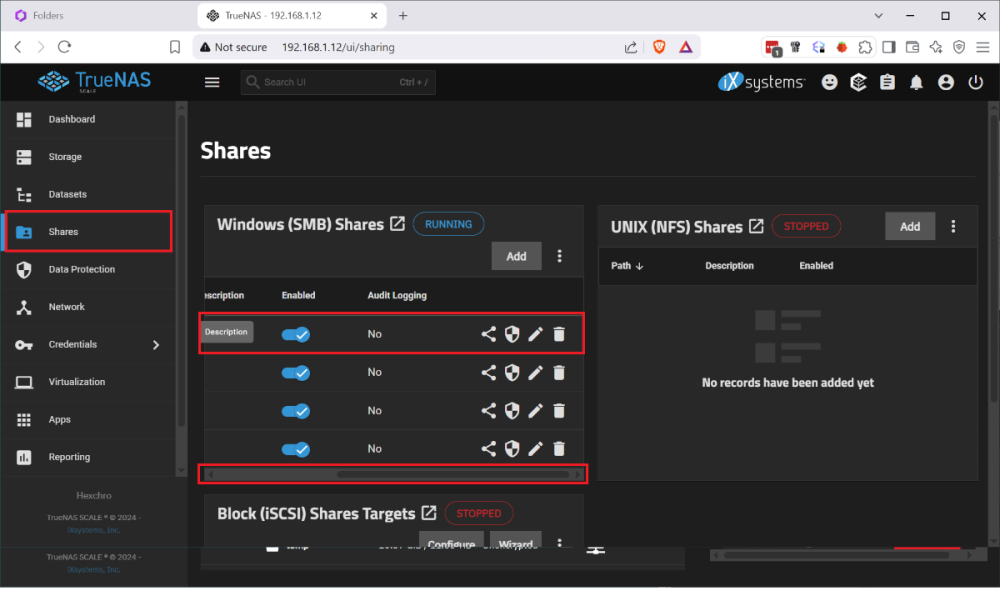
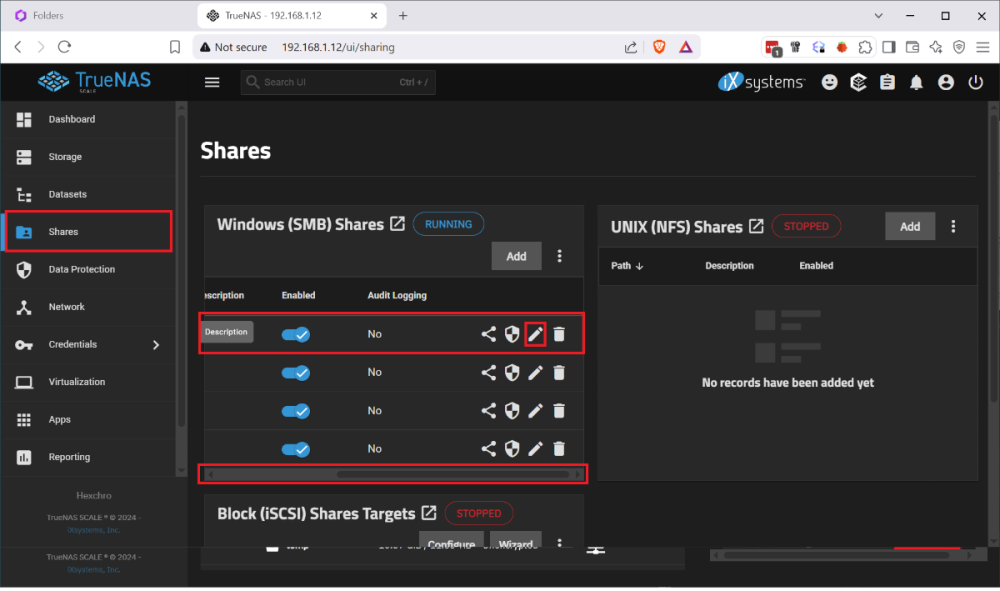
I ran into the issue that my boot drive was corrupted and I had to restore my HexOS install from scratch. I found posts that said basically just reinstall it but nothing that explained the process. I had several issues, when I reinstalled HexOS it wanted to wipe my raid, once i disconnected the raid and went through the initial setup, I had no shares. So I wanted to document this so that others with this issue find a solution instead trying to rename and recreate shares and move data between datasets. This was done after I figured out a process for doing this so sorry if I missed any steps. Step 1. Remove the bad boot drive. Step 2: Disconnect the Raid drives. Step 3: Install your new boot drive and usb HexOS install media. Step 4: Follow the standard install process, including setting your admin account and claiming your server. When you finish the setup you will not have any disks so you will name your server and just continue. Step 5: Shutdown the system. Step 6: Reconnect your raid drives and boot up. Step 7: Log in to the TrueNAS gui by going to the IP address of your server in the browser and using the credentials you set up during install Username: truenas_admin Password: <whatever you entered at install>. Step 8: Go to Storage Tab and select Import Pool. 9: Select your pool from the drop down it should be named 'HDDs' and select Import. It will take a few minutes to import and complete. At this point the storage should be detected in HexOS and you should be able to start creating shares, but your existing folders and shares will not have returned. To get your shares back you must recreate them by renaming your datasets and naming them back as follows: Step 1: Under Datasets you can find all of your existing data on the RAID. Find the Dataset you want to restore in HEXOS and note the name. Step 2: Back in HexOS go to the Folder tab and select 'New Folder' Note: you may want to recreate your old users manually or create your folders with public access and recreate the users and add permissions later. Step 3: Create a new folder with the same name as the Dataset but add a 1 (In this case 'Plex1'). Make sure to keep the array the same 'HDDs; and give it the permissions you want (this can be adjusted later). Step 4: Back in TrueNAS go to Shares and select the edit button on the 'Plex1' share, depending on screen resolution you may need to scroll the horizontal scroll bar to the right. Step 5: In the side bar remove the '1' from the Path or use the drop down to select the original shared folder, then click into the Name field which should auto update and remove the 1. Step 6 Scroll down and click 'Save' and you will be prompted to restart the SMB service, do this and your share should be updated. Step 7: Navigate to the dataset tab select the 'Plex1' dataset and click delete on the right side. It will make you confirm by typing the whole dataset path. Step 8: When this is done you should be able to refresh the folders tab on the HexOS page and see the updated folder name (it took a minute to refresh for me). Redo this for each share that you wish to recreate. Once I did this and set up the users and permissions correctly, other servers I used to connect to my shares started working seamlessly. I didn't experience this but I can imagine you may run into some permissions issues since the new users in HexOS could have different IDs than before. Unfortunately you would need to manually adjust permissions on the files and folders. P.S. I imagine minutes after posting this someone will tell me I am dumb and should have done it this way, or someone else posted better over here. If that's the case let me know and Ill point to a better example, but when I needed help I couldn't find it.2 points
-
Hey there! For advanced uses you can set up the UPS functionality within trueness if you have a supported UPS (which is most modern - be with USB or network connected). While it is slightly more technical, can be done and it's not too hard. You can also setup Peanut which will interface with Nut in truenas and give you a nice GUI.2 points
-
I got it to fix below is my step-by-step solution Select Unclaim Server Plugged in HDMI cable to server to a monitor Reset the Server I was not getting any output so I did a reset to get an output. There was a boot window upon restarting the server, I selected it Let it boot while my other/main PC was on the HexOS dashboard discovering After about 10~ min it was discoverable Boot up took a while to complete Followed the "start-up" prompts on the HexOS dashboard I skipped the Storage set up process because I already had them set up prior Everything was working like before, but it did NOT complete the update that caused this issue I am holding off on updating until there is a more stable release. Hope this helps someone!2 points
-
@Dylan OMG OMG OMG I figured it out! I went into TrueNAS and found the Applications dataset, found the permissions and everything looked fine there, but I also noticed that under the Applications folder there was the Plex folder. Only the Plex folder. Because I had only installed Plex, nothing else. And since I uninstalled it, it shouldn't still be there. The fact it is still there, I reasoned, could be causing issues when it tries to install. I figured it must not have fully deleted the folder during the uninstall. So I deleted that folder and then tried to install Plex again through HexOS and IT WORKED! So happy! Thank you for pointing me in the right place!2 points
-
Hello, We just processed the refund for the 2 pack you purchased. Please give it 5 business days for the credit to show up. Apologies for the delay in your refund. We appreciate you supporting HexOS. Happy holidays.2 points
-
A fine attempt to clarify some of the conflicting nomenclature of how storage verbiage is used. I hope this helps!! (clear as mud, right??)2 points
-
Live fixes do not require users to perform any action locally. They hit our servers and affect everyone automatically. We will get you sorted through support. We are still tracking down why some reboots are losing connectivity to the deck. If you are comfortable with truenas UI, you can revert to a previous working boot by going to System > Boot and them clicking the activate icon on the right for the previous boot environment. Then restart.2 points
-
Damn, launching a major update on the 26th of December is a bold move. I would have launched it in the first week of Jan as people using HexOS and celebrating Christmas would have been travelling (such as myself) and may have unknowingly reset their app settings after the update. I do have a remote connection via Tailscale so it wouldn't be a huge issue but it could have been a ton of work for me and anyone else to re-setup apps, like Immich to enable offsite backups, especially if those people didn't have a laptop or desktop to make the process easier and faster. I'm going to hold off on upgrading the apps until I get back and I'm going to backup all my data and settings before doing so as I don't want to lose access to my existing data and have to reinitialise the sync process. Still, I appreciate the drive to get HexOS features deployed within the calendar year and HexOS continues to improve significantly and return value for money, especially for early adopters.2 points
-
Interesting thing just happened: I updated Prowlarr to test the restore functionality for Sonarr and it wasn't reset after the script got updated. Started up and had all the Indexers and connections still set up. Could someone from the HexOS Team maybe elaborate on what those updates in their scripts actually do?2 points
-
2 points
-
Def not cloud only. If your isp/network supports peer to peer, we can coordinate that and then get out of the way. That is what's included in a lifetime license. If we end up having to relay traffic for some users, that will require a subscription as we will have to pay for the relay traffic, but obviously it will still be encrypted.2 points
-
As much as I like the idea of encrypted datasets (i'm using them myself), I fear that it will cause a not insignificant amount of headaches and data loss. Seeing how many users currently are just reinstalling Hexos if something is not working as they expect, currently, they just nees to mount the pools again and no harm no foul. But with encrypted datasets, where they didn't save the keys or have the keys saved on the encrypted dataset themselves it's bye bye data. So if we go done the path of encrypted datasets, we need to have a way to easily manage the decryption keys. Maybe there will be an option to store them on the Hexos Server and use them from there if anything ever goes wrong with a server. If not, a lot of people are not going to remember where they put those keys X years ago, which are now standing between them and their data. Don't get me wrong, I think those are definitely valid points, but such a crucial part requires a basically fool proof setup to not cause any harm. 🙂1 point
-
I totally hear you on this. Alert Fatigue is a real thing AND a risk. If the dashboard is always red, you eventually stop looking at it, which is exactly when a second drive will fail. That said, please avoid disabling SMART entirely. It’s better to have a "noisy" warning than to be completely blind to a total disk collapse. Here is my take on how to handle this: The risky move is disabling SMART for the disk doesn't just hide the old errors... it stops the system from telling you if the drive starts developing new problems. The reality is HexOS/TrueNAS reports the drive as "Unhealthy" because the drive's own firmware has tripped a threshold. The OS can't "clear" a hardware flag that the disk itself is reporting. The advisement is instead of disabling the service, check the specific SMART attributes (like Reallocated_Sector_Ct). If that number stays static for a few weeks, you might be okay. But if that number is climbing, the drive is a ticking time bomb regardless of the data importance.... replace.... IT.... ASAP. I would recommend you run a long SMART Test. If it passes and the error count doesn't increase, you can sometimes manually tune the alert thresholds in the Disk Settings of TrueNAS to silence that specific error, while keeping the monitor active for new ones. Though that goes against every admin bone in my body. Stay safe with that data my friend.1 point
-
For this, the fix was to in HexOS go into Settings > Reset > Unclaim System. Then reclaim the server and it should be fine. From what I can tell it gets like that because when you reclaim the server before restoring the config backup in TrueNAS the API key is different than what HexOS has so when you reclaim the server it checks and see the API key in TrueNAS and uses that. Sidenote if you are importing your config file back into TrueNAS for the apps if they are gone and nothing happens after you set the pool, try unsetting (unset pool) then select the pool again it and then it takes a bit to run through the HDDs and bam it comes back.1 point
-
We don't have a feature like that at this time. You can try using something like immich-go to help with your migration1 point
-
Oh wow that is not how I expected to read these but I guess it makes sense. lol I'm so used to the "real error" is at the top. But hey it's a good thing for the HexOS Team to look into "if default port conflicts with something alert the User." 😎 Beta tester lol Right now it's at 60% we'll see what happens, hasn't failed yet.1 point
-
I am battling ACL type mismatch issues for the "Applications" system share after the Immich config upgrade changed the postgres data path and I had to manually move data there. Not sure if I caused this situation by moving files or if the "config upgrade" will do that by default, but it's quite probably people going through the same issues and manual solutions as me would end up in the same situation Current status is: No SMB share config change is allowed on the "Applications" system SMB share; no chaning its access permissions nor even disabling the share altogether. Which is problematic as it now stores a database for a privacy-sensitive service, which now landed on a "public-by-default" datastore shared through the LAN. I highly advise people with limited free time during this holiday season to not perform any such new "config upgrade" until either things are sorted our, or you have enough spare time to fix breakages. There is no immediate issue with not doing it now, and no huge immediate benefit either, so just wait it out for now while the adventurous like me try to survive the unforseen consequences 🙂1 point
-
Just got the update and have this feedback on trying it out on immich: Thank god I didn't start with Nextcloud. Is this the expected behavior? Or is something rather pointing to me having done something wrong that ended up in data being left behind? Maybe I didn't read a warning prompt right? I think I'll land on my feet moving things manually for immich, but I have a lot more users on Nextcloud and I'm not sure I feel confident going through this again with Nextcloud... Let me know if another communication channel is more appropriate to discuss this further PS: please don't roll out risky things during holiday seasons. It's not worth it.1 point
-
Feature Suggestion: UPS Integration for Automatic Shutdown Enable Hexos to natively support UPS devices for automatic safe shutdown during power outages. • Benefits: Prevent data loss, monitor power status, and improve reliability. • Implementation: Integrate protocols like apcupsd or NUT for broad UPS compatibility and allow configurable shutdown actions. Would you like help submitting this suggestion? support UPS devices for automatic safe shutdown during power outages. • Benefits: Prevent data loss, monitor power status, and improve reliability. • Implementation: Integrate protocols like apcupsd or NUT for broad UPS compatibility and allow configurable shutdown actions. Would you like help submitting this suggestion?1 point
-
I'm not sure if this is what you mean, but immich-go can be run by using the shell in truenas. At the risk of outing myself, an LLM of your choosing may or may not be helpful in suggesting some command syntax. (if you do that... please double check that your command makes sense using the immich-go documentation first, and you have an option of running the command in a 'test' mode where nothing is actually done just to verify your settings.) I'd also recommend using tmux to allow the script to run in the background if you have a transfer that is large, and for a very large transfer, I found it necessary to split it up into smaller chunks.1 point
-
at the top of the hub, you can select the store tab and then orders or manage purchases. both should show you how many licenses you have1 point
-
Where can one see the number of licenses on thier account? I just bought a second lics for $99 as I would like to setup an off-site backup down-the-road, once you have settled into a non-beta version. I have been playing a bit with my current setup, but haven't committed all my files over from my Synology NAS until you move to Prod/final version. (I guess that is in Q1 of 2026!!) I will be looking at setting up a very simple HexOS offsite box, just bare system with a few large HD's in it for backing up my more important data. I am just waiting till you have moved out of beta. Thanks for the sale and the cool interface!! Merry Christmas all!1 point
-
It's hard to believe it's already been a year since we launched the HexOS Beta and the early access campaign. What a journey it's been! In today's blog post, we're going to provide a summary of this past year's accomplishments, a run-down of what's left to achieve our 1.0 release, what's coming next, an update on the AnyRaid project, and our HexOS Holiday Sale! Read all about it in our latest blog post: https://docs.hexos.com/blog/2025-11-26.html1 point
-
Another quarter until version 1.0. Can't say I'm not disappointed, but I get that quality takes time. At least give us a bone in the meantime.1 point
-
Are we really talking about the "failure" of HexOS before we even go live? I got told off when I brought up this possibility several months ago and I was just talking about having backups. Can we at least wait until either Eshtek sounds a warning of some critical issue, Eshtek misses a checkpoint established for a specific date or they go even more silent?1 point
-
Pretty disappointed with this limitation. I understand the reason to avoid unscrupulous reselling, but I do think there are better ways of avoiding that without these issues. There are probably a lot of people in a similar situation as me; wanting to get a license for a relative as the family tech guy, but not wanting to have to be the sys admin for everyone. I bought a license at release because I support the mission, with no intention of using it until the features got more flushed out (still on plain TrueNAS). I am in the process of building a NAS for my father, which I intended to set up with a HexOS license so he could use buddy backup and some apps as a relatively nontechnical user. The HexOS interface is simple enough I think he can grasp it. But if I have to be an admin for his NAS anyway I might as well just set up Tailscale and rsync on TrueNAS. I understand it's a sale price and I'll probably end up getting him his own but it just feels like a slap for people that bought in to support and I hate feeling like I'm throwing money away. I'm no business major but it seems like expanding the user base would be prioritized given the possibility of genuinely useful subscription features coming down the pipe. Anyways. Just my $0.02. Still love what you guys are building.1 point
-
So the difference really comes down to the account you use to login and manage each system . if you want to give someone else access to manage one of the systems. If the license is on your account, you have to give them your login. Otherwise, buying on a seperate account you have to give them the seperate login. The latter not being as cheap as the former.1 point
-
So If I am understanding this, if the second server is in a relatives house it is not their independent account but rather is is another server under the same login. So I don't think we can use the term "buddy backup" unless you are saying each server can allocate an encrypted space on the other that can't be accessed. I think that will be the terminology sticking point. I must say when I first saw the option to buy a second $99 NAS server I myself thought I could setup up a buddy backup as well at a relatives home but wasn't sure it could be used as a full independent server by that relative because they are not going to want to go down the NAS path. I am guessing a lot of people will have that same thought and if i am still being honest I think Eshtek realized that would be the reason many folks would go for that option. So, let's be clear and careful about the use of the term "buddy backup". Can it be a remote backup? Yes. You have already told me above that it can. But can it be a buddy backup? It sounds like no, not really as defined in the sales materials. Now, as for that person who bought two accounts during the original black friday sale. I can see them having a legit issue because I believe I have seen them say that is why they got the two accounts in other forum posts a while back. If this is true it should have been stated then that multiple servers on one account can't be true buddy backups. I don't really have a horse in this race because I want another server that will be my 'media available outside my home' through Plex or Jellyfin and Immich.1 point
-
I believe the distinction is that Buddy backups, etc, will need to connect to the cloud for configuration, but not for ongoing use. I can see how that could be confusing for some people.1 point
-
honestly we don't much about when its coming just that it has started development. it was probably more about setting proper expectations that its not gonna come anytime soon. probably best not to build off of beyondRAID since it was slow. slow is bad in so many ways. resilvering is longer, giving drives a longer window where failure would be catastrophic expansion and scrubbing would also take forever. plus don't we all want our systems to be as fast as they could be just a guess but i would assume it has to do with the parity calculations and making sure the zfs stuff works correctly. the forums are here for all your questions so don't be sorry. local interface is definitely still coming. I just don't have an eta to give you.1 point
-
I'll just answer myself. It is. I had previosly updated TrueNas to Fangtooth which is not supported and I messed up the boot pool so I wanted to reinstall but was worried about it (I was thinking on just dropping HexOS and use TrueNas directly with the latest version). I was able to reinstall everything following these steps (I had a recent copy of the truenas config): Follow steps 1 to 6 Update TrueNas from the UI to Fangtooth Reimport TrueNas config profit This was easier than I though and I didn't lose any data.1 point
-
My drives have never spun down even with Advanced Power Management Level 1. The solution: I moved the System Data Set to the boot-drive (System –> Advanced Settings –> Storage –> Configure) and now they do!1 point
-
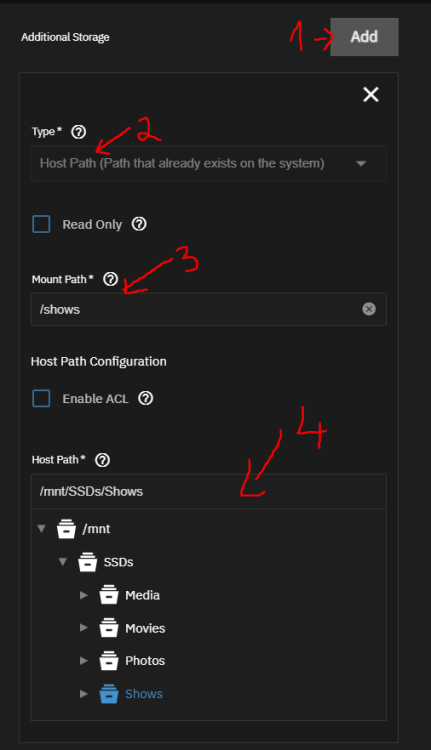
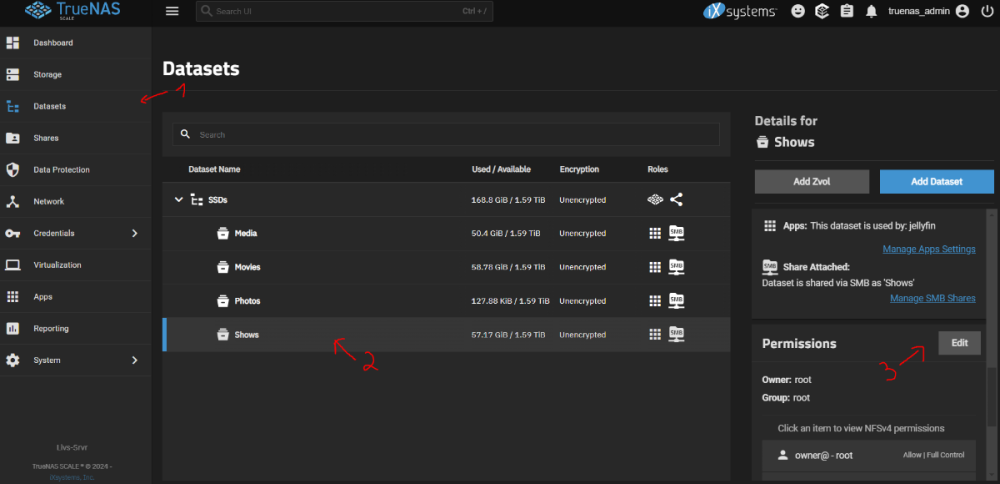
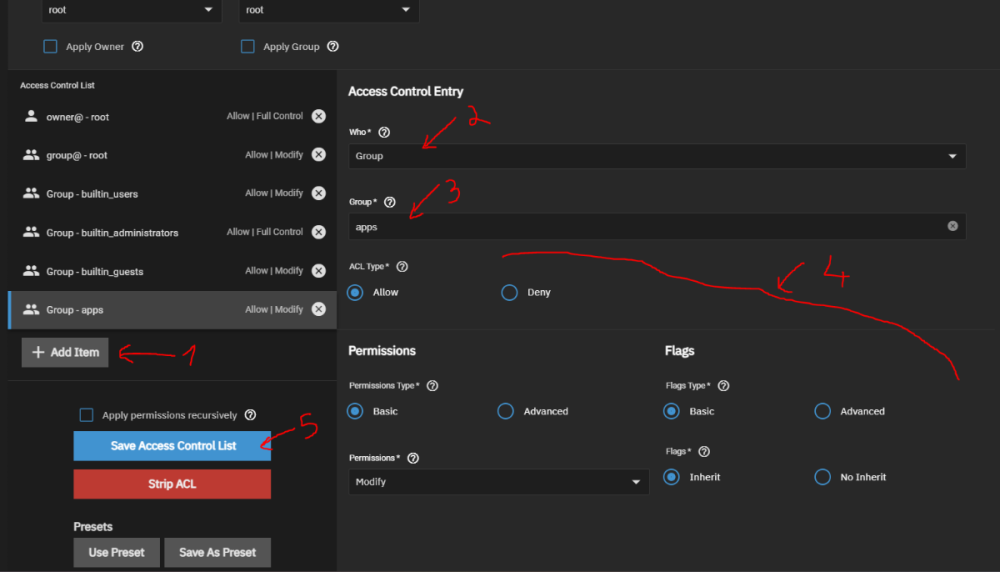
also, a quick tutorial how i set up Jellyfin: Create a public folder in HexOS Go to apps in HexOS, go to Jellyfin, and click Install. It will open TrueNAS UI. user is truenas_admin and password is the HexOS password. (If it sends you to TrueNAS dashboard, go back to HexOS, Jellyfin, and click on Install again) Under Network Configuration check Host Network Under Additional Storage, click Add, choose Host Path, in Mount Path is how the folder will look in jellyfin, in Host Path find the folder you created in HexOS. Thats it for the settings, click Install at the bottom Now in TrueNAS UI go to Datasets, click on the folder created in HexOS, scroll down to Permissions, and click Edit Click Add Item, Who: Group, Group: apps. (you need to scroll at the end once or twice to be able to see full list, then find apps, should be near the end, its not in alphabetical order). Set permissions like in the picture, then click Save Access Control List. Thats it for folder permissions. Go to Apps, jellyfin, and click on Web UI. Then from there set up Jellyfin as normal, when u click on +Folders you should be able to see the folder you added in Host Path, /shows in my case. Thats it, jellyfin should work as normal now, just as if you set it up on your windows machine.1 point
-
Ive got qbittorrent and plex running already but from what I can tell setting up airvpn isnt that simple - so would love an easier way to do that for qbittorrent specifically. And nextcloud. Have tried to set it up using the godawful truenas instructions but to no avail.1 point


