

ShinobiRen
-
Posts
41 -
Joined
-
Last visited
-
Days Won
1
Content Type
Profiles
Forums
Articles
Blogs
Store
Everything posted by ShinobiRen
-
Just here to say - you guys are awesome and thanks for keeping your promises! I'm perfectly fine with deck and enjoy being able to pull up the stats quickly anywhere I am, but local hosting is so important to this community, so thank you.
-
I have the Intel X520 card in mine (SFP instead of RJ45) and it worked after a reinstall of HexOS. I recommend using Fiber when you can because RJ45 gets hot quickly, Also make sure it's not a clone card, they seem to be out there in the wild quite often. One final thing - with mine it only wanted to use the Intel SFP modules, probably not an issue with just RJ45 though if you run into it you can flash the EEPROM on the to accept any modules.
-
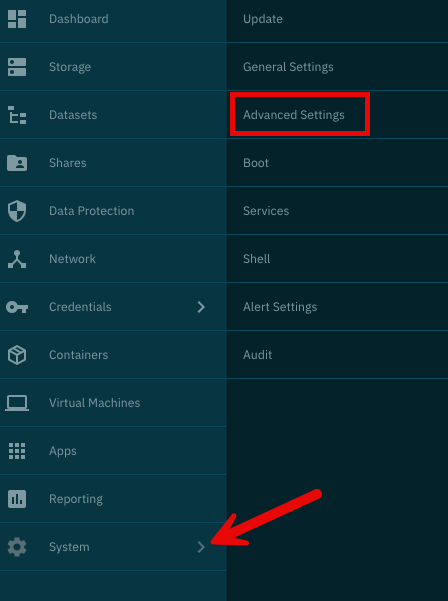
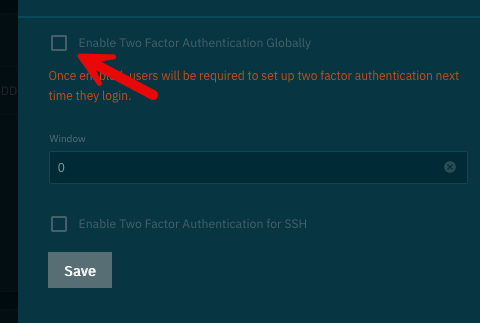
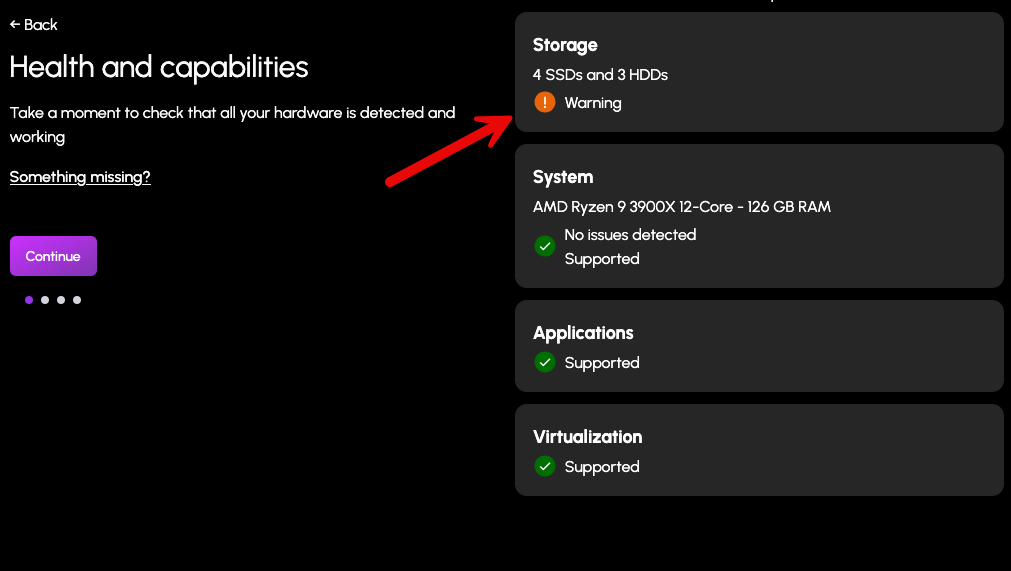
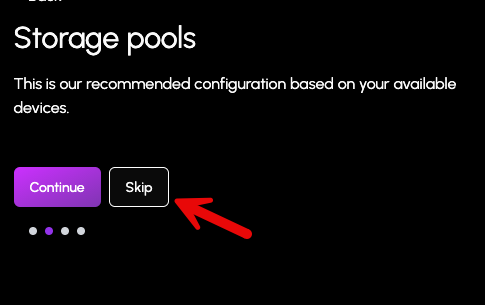
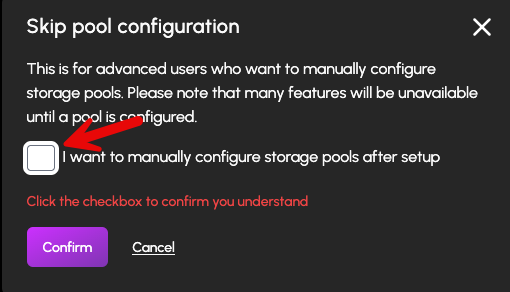
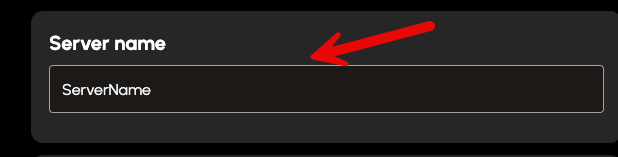
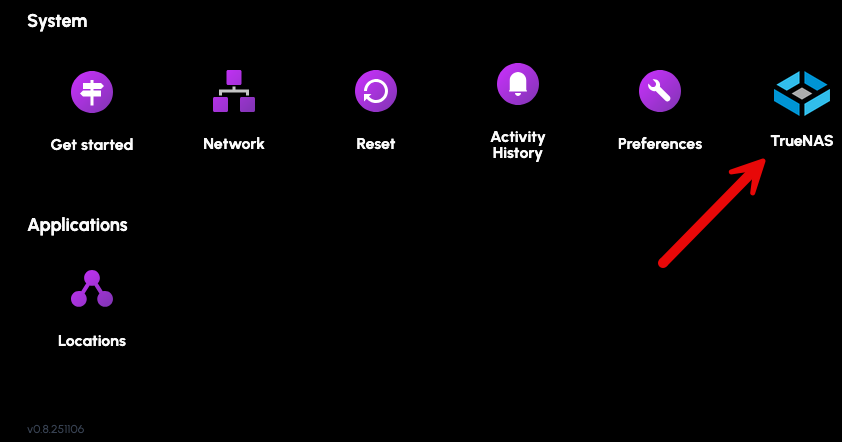
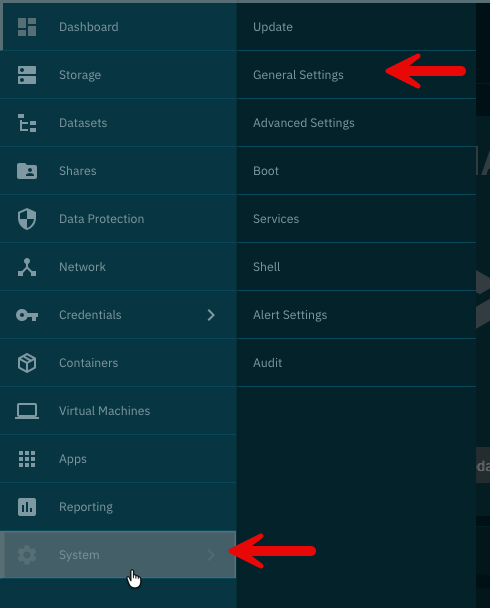
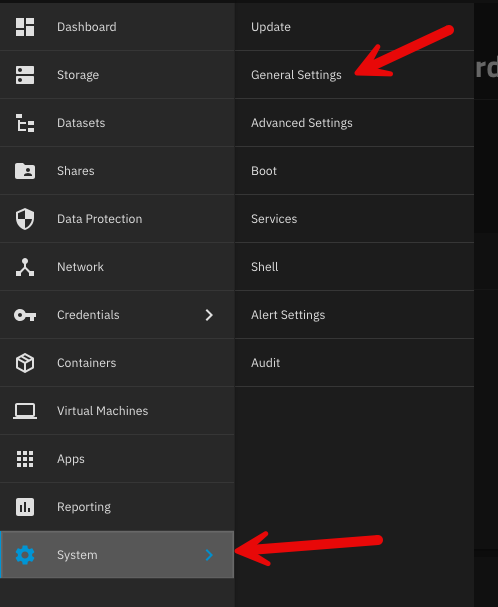
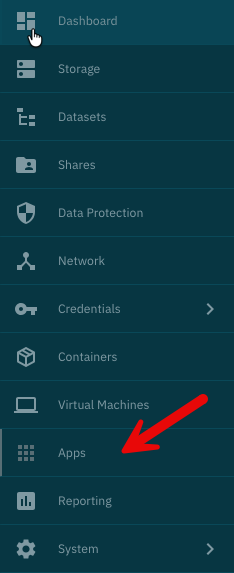
1. The issue was caused by 2FA being turned on by the configuration import. To resolve it all I did was go to System > Advanced Settings and turn off Global 2FA: 2. Once you have that resolved HexOS will now see your server and note a warning on your Storage. This is a good thing. 3. Move to the next screen and skip creating a pool. 4. Give your server a name and you are finished!

-
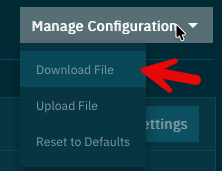
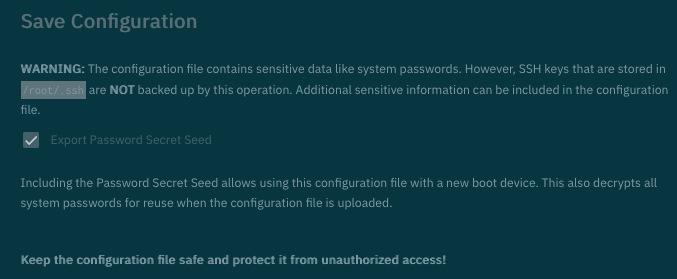
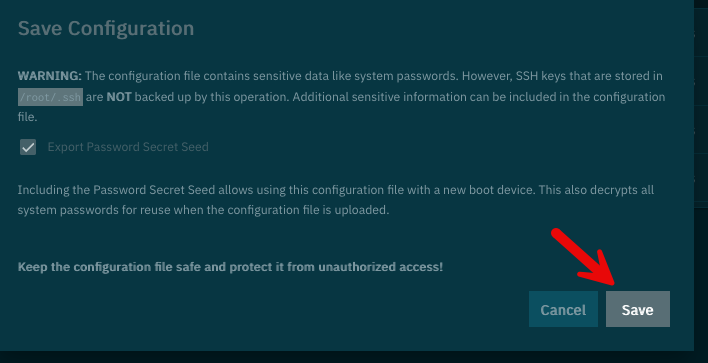
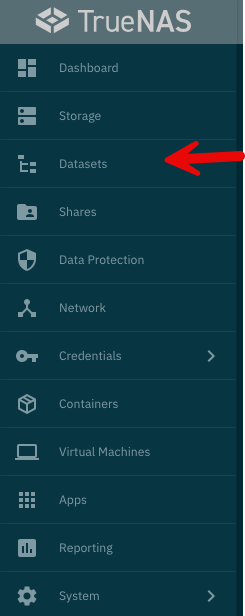
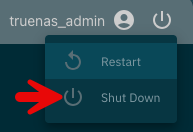
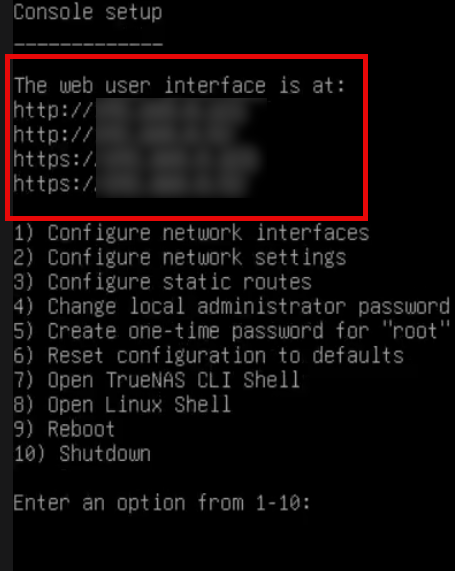
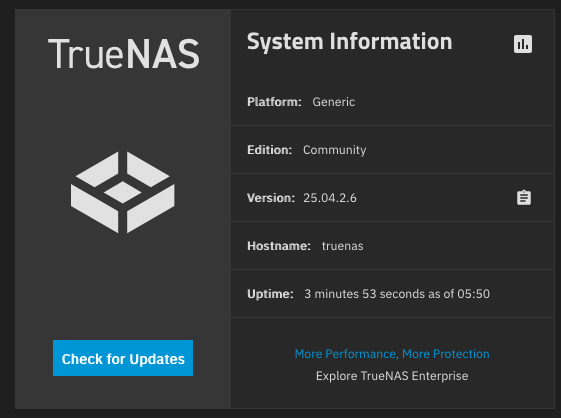
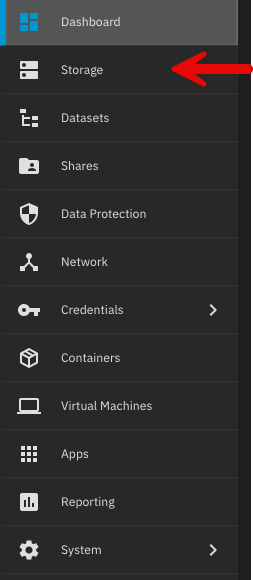
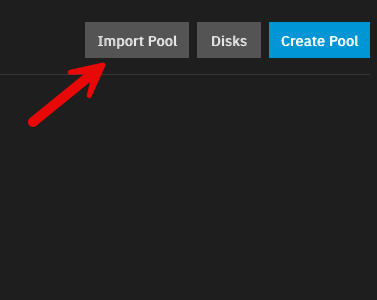
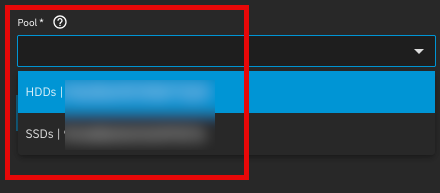
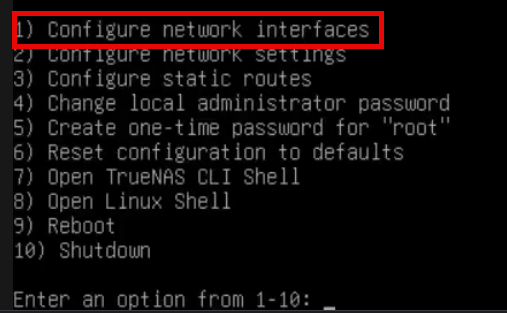
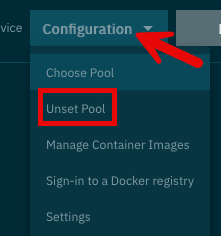
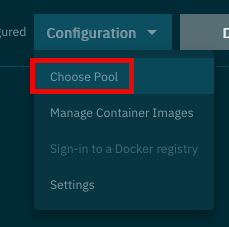
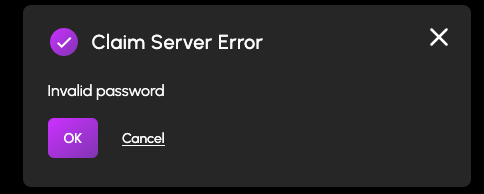
First, a huge thank you to @lnkd for posting the actual steps to do this. All I did was follow everything they said and take pictures, so really all credit goes to them. Original post here: Prepare TrueNAS for reinstall: 1. Login to TrueNAS web interface – go to deck.hexos.com and click Settings: Then click the TrueNAS icon: 2. Once logged into TrueNAS, go to System > General Settings > Manage Configuration > Download File: 3. Read the note presented when you click Download File: 4. Click Save: 5. If you have encrypted datasets, go to Datasets > select the encrypted dataset > Export Key: 6. Now it is time to shutdown the server. In the top right of the TrueNAS web UI click the power icon and click shutdown: 7. Make your changes to the hardware that you would like – for me I added a 10 GB network card to run off fiber. 8. Prepare the HexOS installation drive by following these steps: https://hub.hexos.com/topic/103-illustrated-installation-guide-start-here/ 9. In your router settings, give the new hardware the same IP as your old one, then restart TrueNAS to grab the correct IP. 10. Once rebooted you can confirm on the server the IP address is correct: 11. Login to the TrueNAS web interface with the username and password you set during install (username should be truenas_admin). 12. Confirm your version on the dashboard – if needed, apply the update to the server: a. To confirm what version you need check the filename of the .tar file you downloaded from your configuration. It will have the version number on the end of it. b. Select the same version from the upgrade screen and confirm you want to switch to that upgrade train. c. Apply the pending updates and the system will reboot. 13. Go to Storage > Import Pool > find your zpool: 14. I have two pools so I will import them both. 15. Go into System > General Settings > Manage Configuration > Upload file: 16. The server will reboot after the configuration is applied. Log back into the TrueNAS server once the reboot is finalized. 17. If, like me, you replaced the network cards you will need to login directly to the server and adjust the IP settings: 18. Setup your new interface with the primary IP in CIDR notation, then you can log back into the TrueNAS server. 19. To setup apps, you need to go to Apps > Configuration > Unset Pool: 20. Restart your TrueNAS server then go back into Apps > Configuration > Choose Pool: 21. Once the pool is set you will see your apps again and be able to start them. 22. Navigate to the HexOS Interface (http://deck.hexos.com), unclaim your old server and claim your new one: 23. I ran into an issue where no matter what password I input it would not take it: 24. Currently troubleshooting that to be able to claim my HexOS server in the deck. All of my apps and storage are up and running so I will report back here when I fix this issue.
-
Awesome! Thank you for this - makes me feel a bit more confident going into this weekend.
-
I am actually thinking this might be the only way to get my TrueNAS install to see my newly installed 10GB SFP+ card. If you have already done it @lnkd can you let me know if this worked out well for HexOS? If you haven't I am planning on doing it this weekend and writing a full guide for the process for anyone else to use.
-
 I also had the same error and can confirm I am updated to 25.04 Fangtooth from TrueNAS: Might be a good idea to add a panel like this to the deck to confirm the version number, or if there is already one I cannot seem to find it.
-
Right side toggles but closer to the settings (words) they accompany. Thanks!
-
Quite a bit faster for me as well. Thanks!
-
Potential First NAS Server Build Questions and Concerns
ShinobiRen replied to Rubiksgocraft's topic in Show & Tell
If you have 5.25” bays (like for a CD/DVD reader) these could be a good option for you. I’ve installed one and it works really well. https://www.newegg.com/icy-dock-mb830sp-b/p/N82E16817994238 -
Nice - thanks for the clarification. The HBA wasn't strictly needed - it was a nice to have and I can use it on another system I have. Thanks for the handy reference for this board!
-
TL;DR: You cannot run an HBA and Asus Hyper M.2 x16 Gen 4 card and utilize all 4 NVMe drives (at least from the testing I have done - if anyone has been able to get this to work please let me know!) I plan on posting my entire build process for my "stable" server once it is finally complete and I have all the resources together but wanted to post this in the off chance anyone has the same or similar setup I am running and runs into this issue. I am running a Ryzen 3900x CPU with an Asus ROG Strix X570-E motherboard. These are leftovers from a gaming computer upgrade I did earlier this year to get on AM5 but it got me thinking - Asus makes this handy NVMe expansion card here: https://www.asus.com/us/motherboards-components/motherboards/accessories/hyper-m-2-x16-gen-4-card/ I happened to have 4 spare NVMe drives from doing upgrades for my kids PCs last year that I haven't recycled yet so why not give it a shot? I bought the expansion card, got it slotted, configured the BIOs to pass off all four to HexOS (TrueNAS) and was able to create a nice 3 TB pool in RaidZ1: No problem there. I went to add in an HBA (9300-8i) and the NVMe card dropped two drives from it. Tried every BIOs setting in the world I could think of but no dice - if I wanted to run the HBA and the NVMe expansion card I could only have two NVMe drives. Hope this helps if someone else has this same issue!
-
Replicating Virtual Machines from one TrueNAS Server to Another
ShinobiRen replied to ShinobiRen's topic in Show & Tell
I went to replicate some additional files tonight and ran into this error: "Access denied to replication.list_datasets" Turns out SSH was disabled on my target server. Flipped it back on and worked without issue. In case anyone else runs into this! -
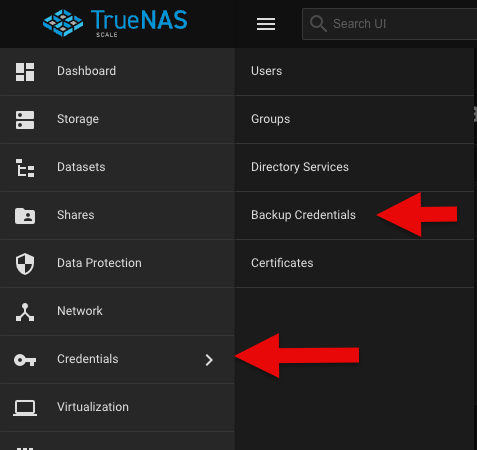
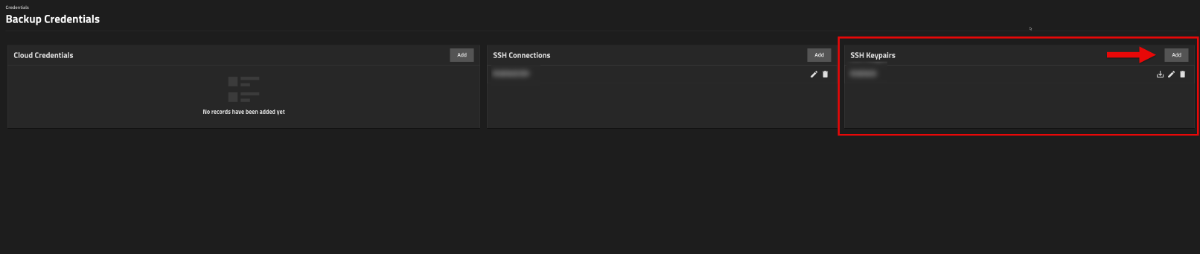
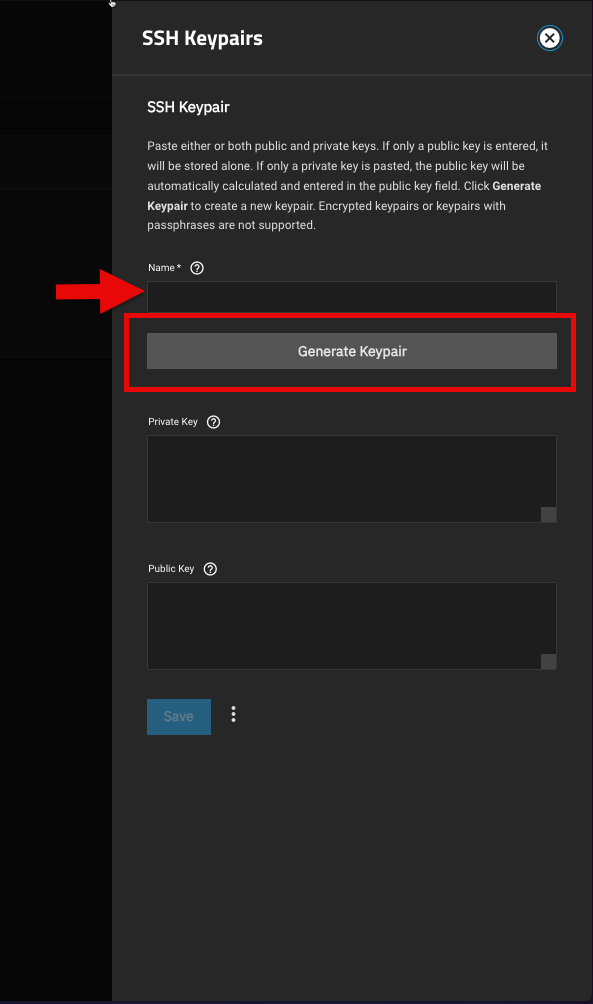
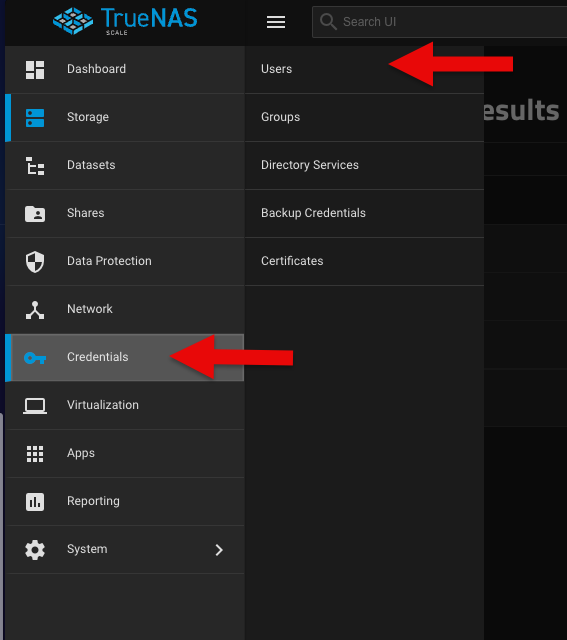
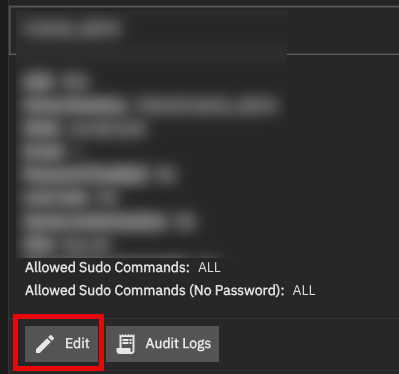
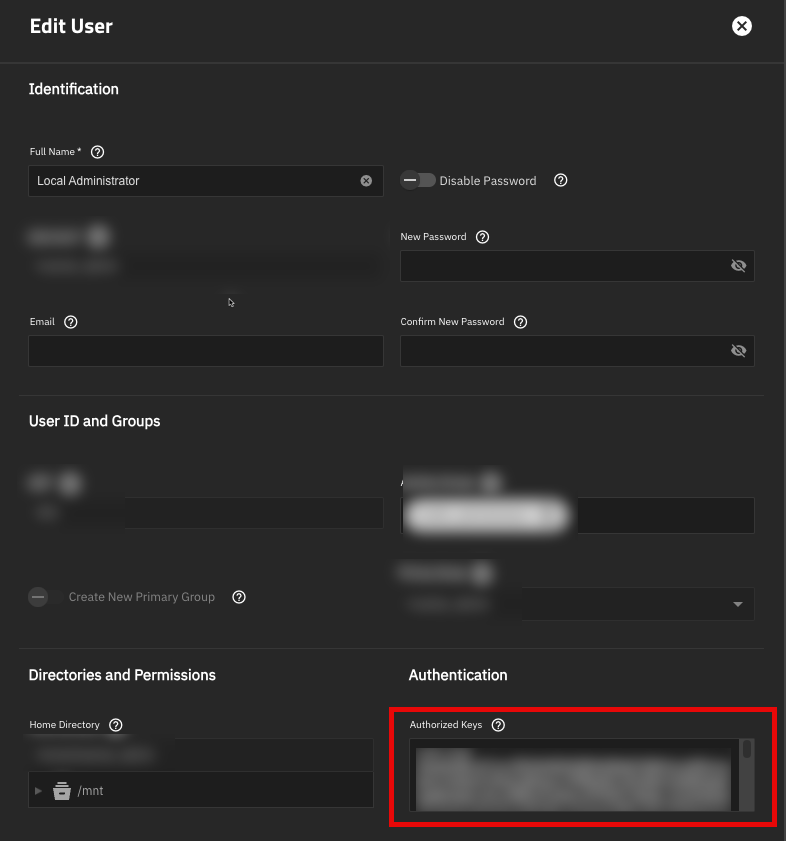
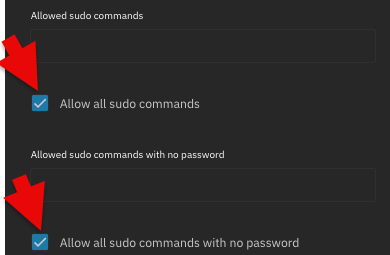
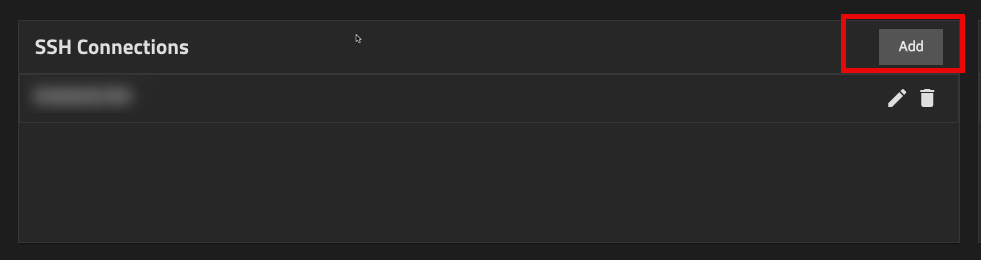
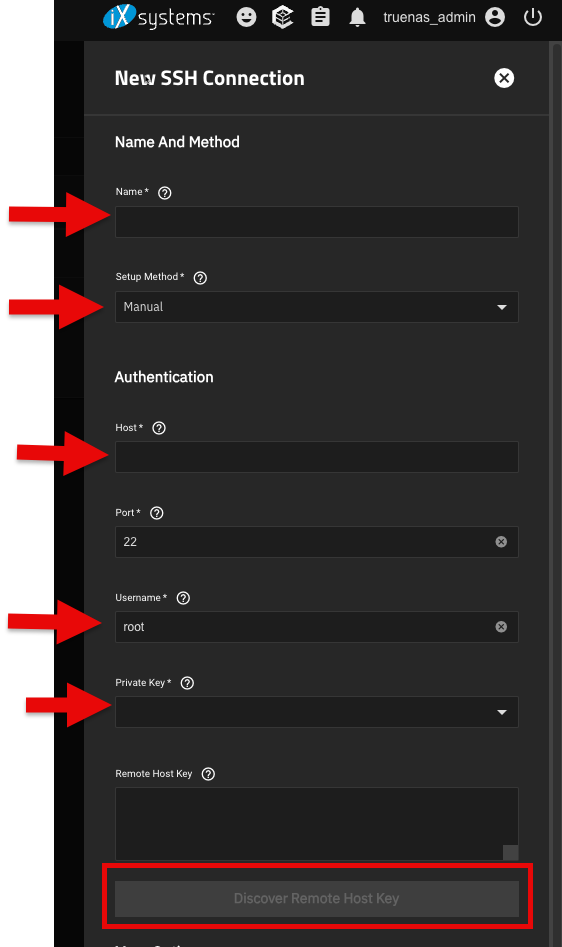
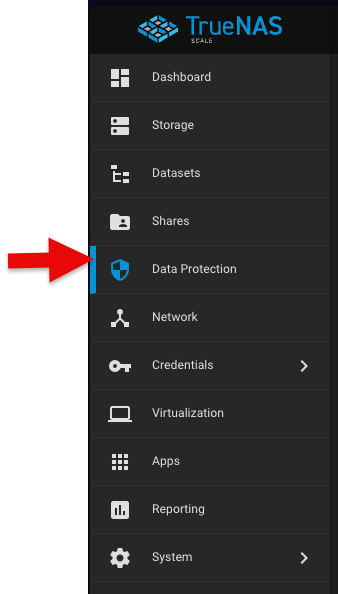
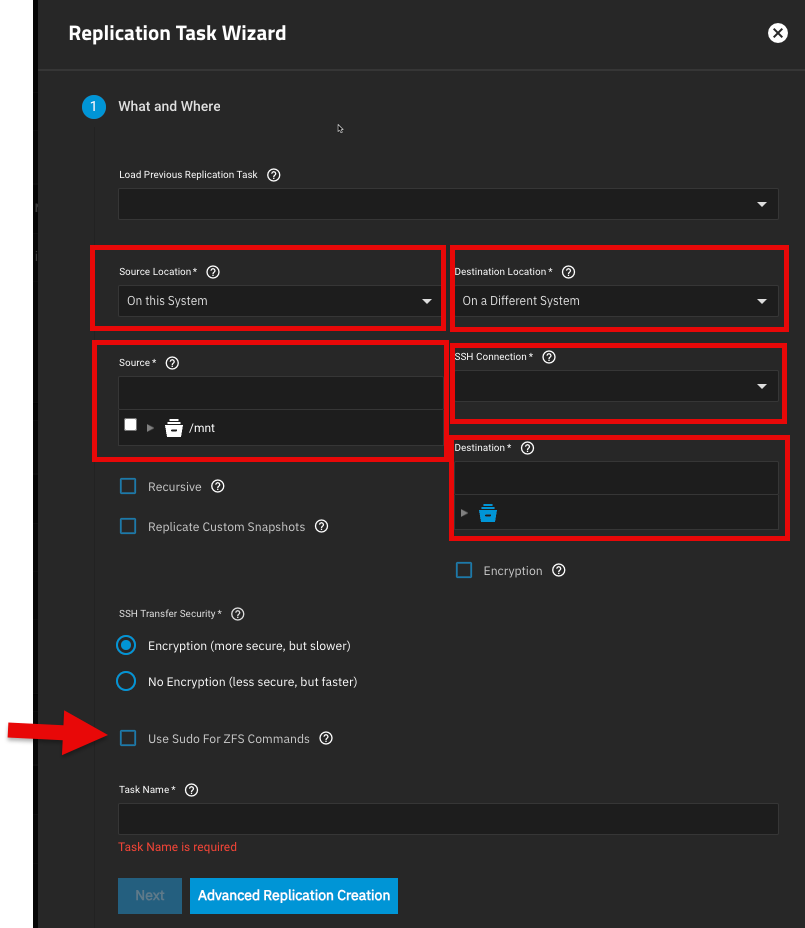
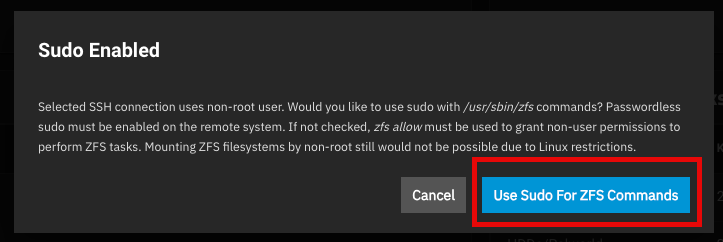
Hello everyone! I wanted to setup a secondary server - one for testing to break things and one for a more stable NAS environment that I will wait for HexOS to support updates and etc. To do this I needed to get some things off of my test server - primarily my VMs that I had created. Here is how I setup replication and moved the VMs. Hope you find this useful! 1. Find the VM you would like to move. 2. TrueNAS should be able to make the connection to the other server but it sometimes (frequently) fails to do so, so I will dive into how to do it manually. 3. Setup the backup credentials on the server you are transferring from. In my case this is my 01 server. 1. Navigate to Credentials > Backup credentials on the left side: 2. In SSH Keypairs section click the Add button 3. Give your keypair a name and click the Generate Keypair button: 4. Copy your Public Key. You will need this on your new server. 4. Setup the keypair on your new server. 1. Navigate to your new server and Credentials > Users 2. Select the user you will be using to do your ZFS replication task and click Edit 3. In the Authentication section of the edit dialog for the user you should see "Authorized Keys". This is where you will paste your public key that you generated. 4. Scroll down and check the box that says "Allow all sudo commands" and "Allow all sudo commands with no password". 5. Time to setup the SSH link on your primary server. Navigate back to it. 5. On the primary server navigate back to Credentials > Backup Credentials and click Add on SSH Connections 6. In the new dialog give it a name, change the Setup Method to Manual, and fill out the rest of this information (including selecting the Private Key you generated): 7. Once you select your Private Key you can click the Discover Remote Host Key button. 8. Click Save. Now it is time to generate a replication task. 9. Navigate to Data Protection on the left side and click Add on Replication Task: 10. Fill out this information and click Next: 11. When you select your SSH credentials this dialog opens. Select "Use Sudo for ZFS Commands" or check the box with the arrow above. 12. If you have snapshots for VMs you can select "Recursive" to copy those snapshots over. 13. Keep your name that TrueNAS generates for you or rename it to something else and click Next. 14. In the When section I selected "Run Once". 15. Save it and the replication will start. If on the same network it is incredibly fast - Moved two VMs roughly 120 GB in less than 5 minutes. 16. Verify on your new server the zVOL disks you copied over are present and recreate your virtual machines as you would setting up a new VM, linking the VirtIO disks you just replicated.
-
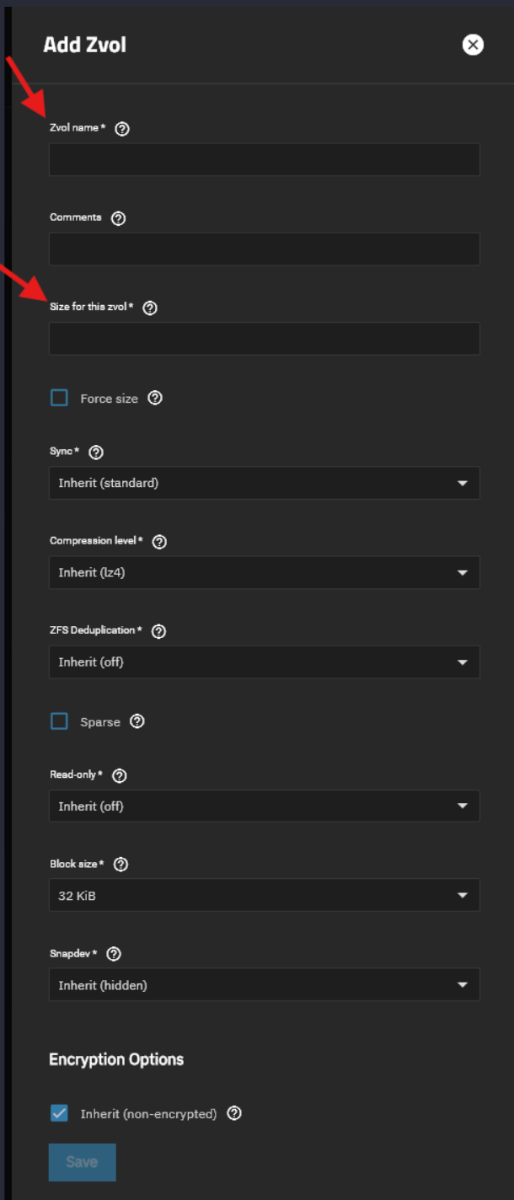
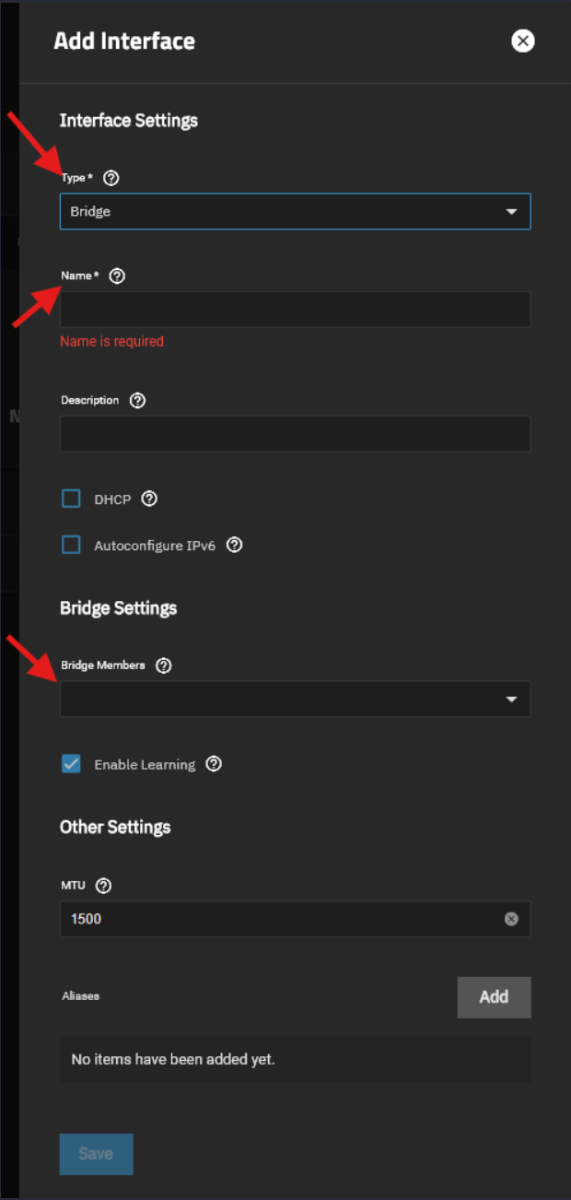
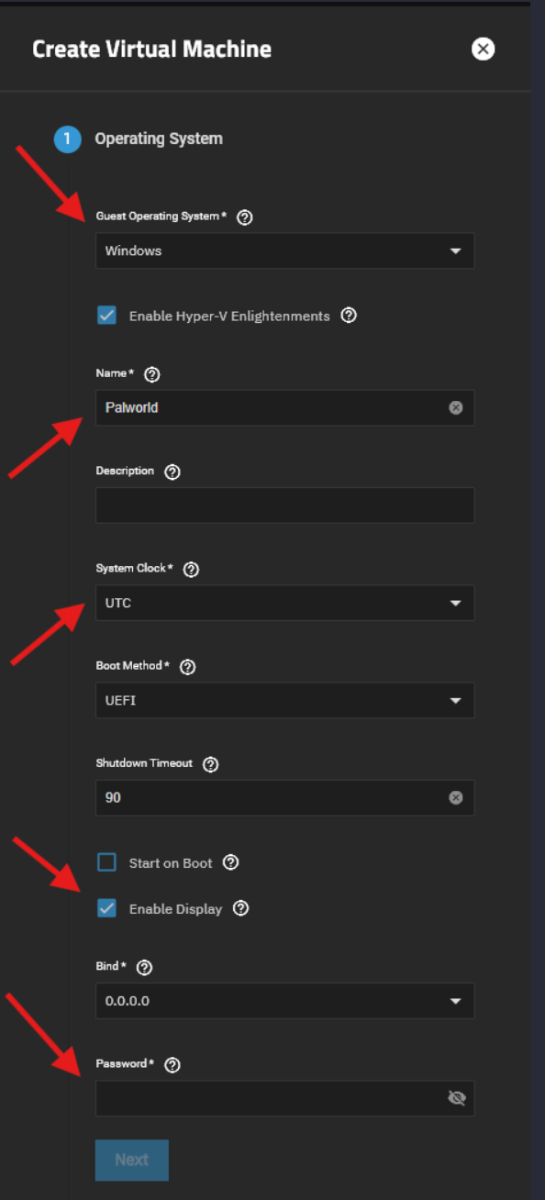
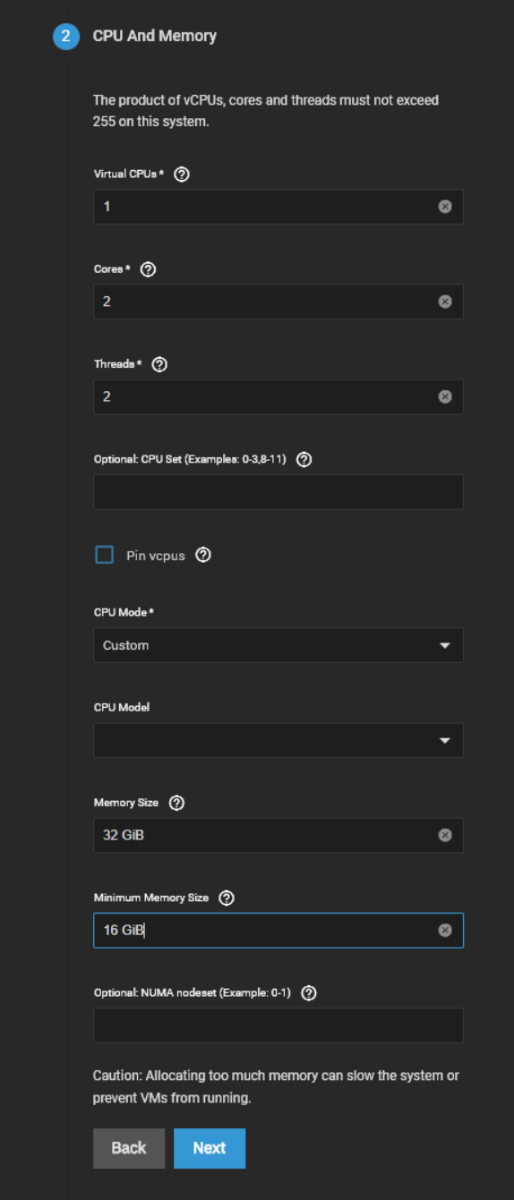
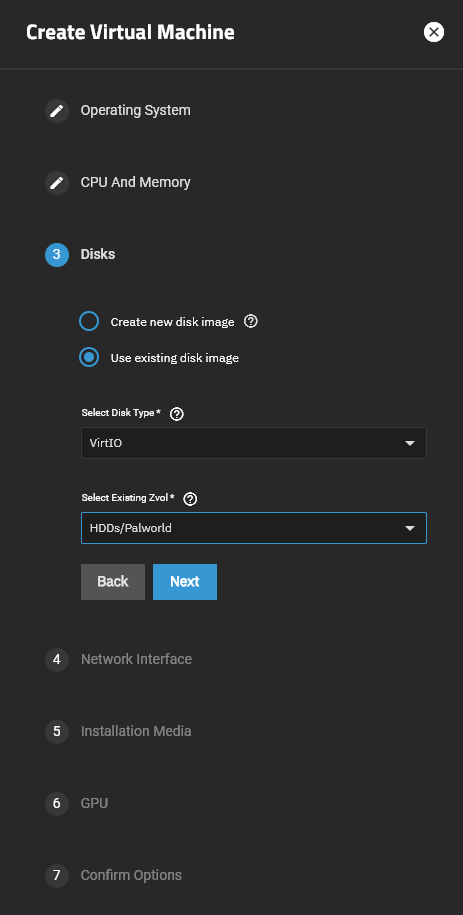
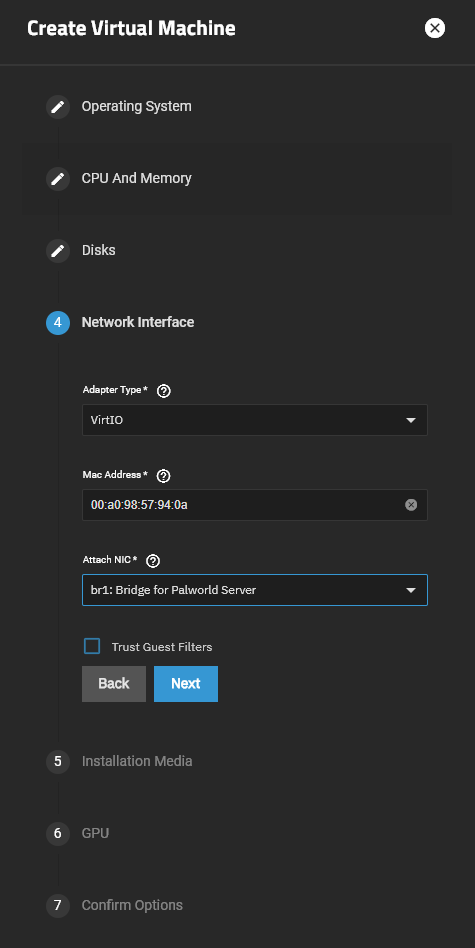
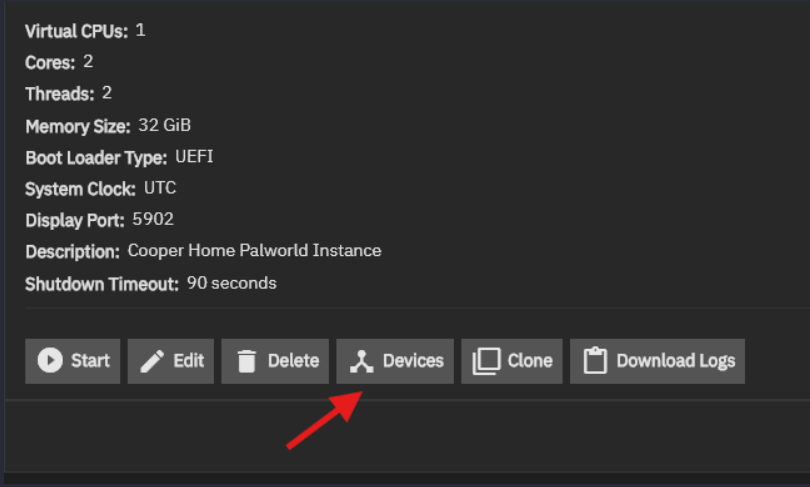
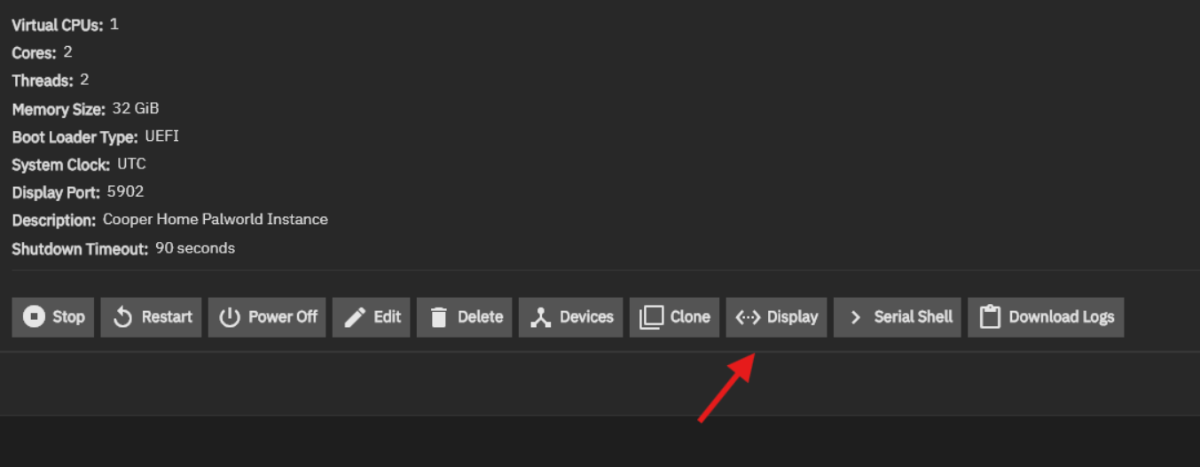
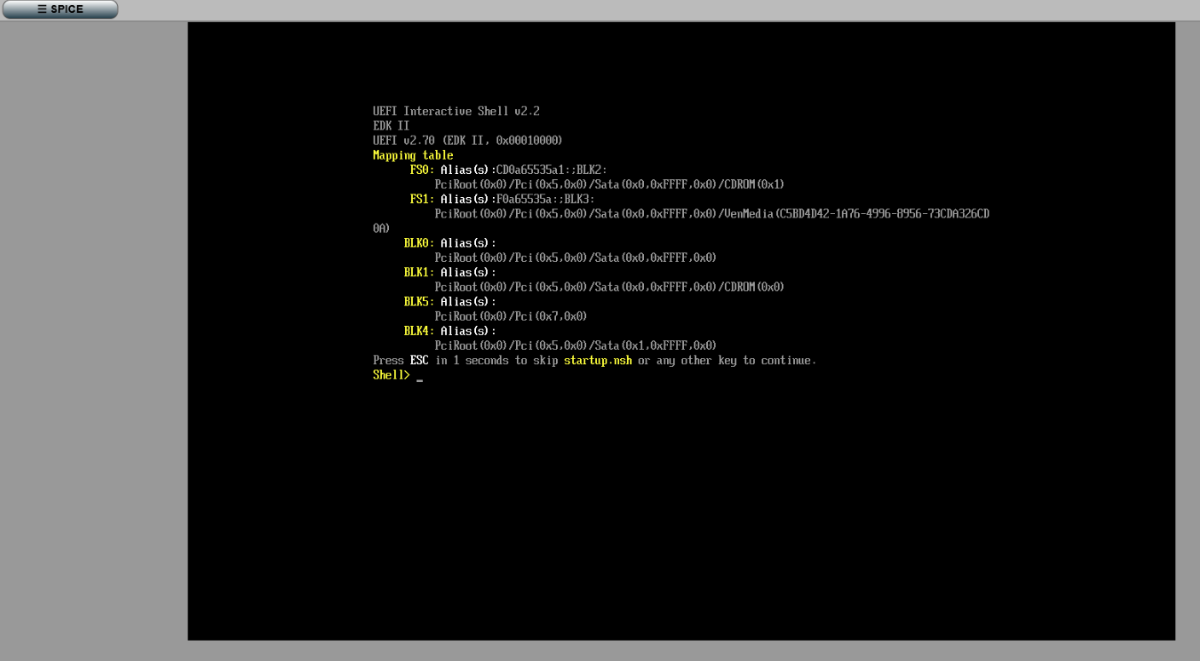
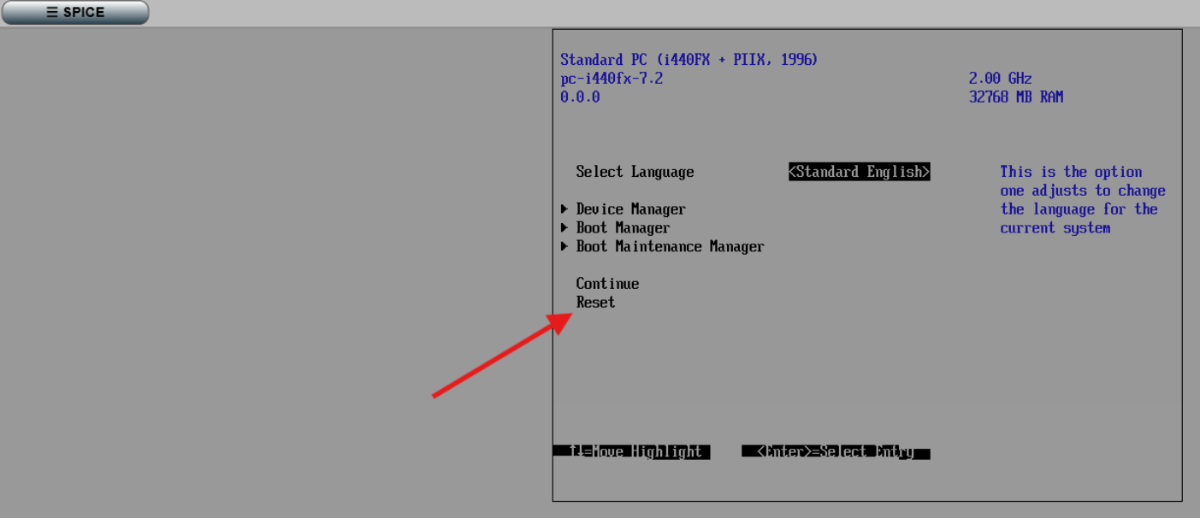
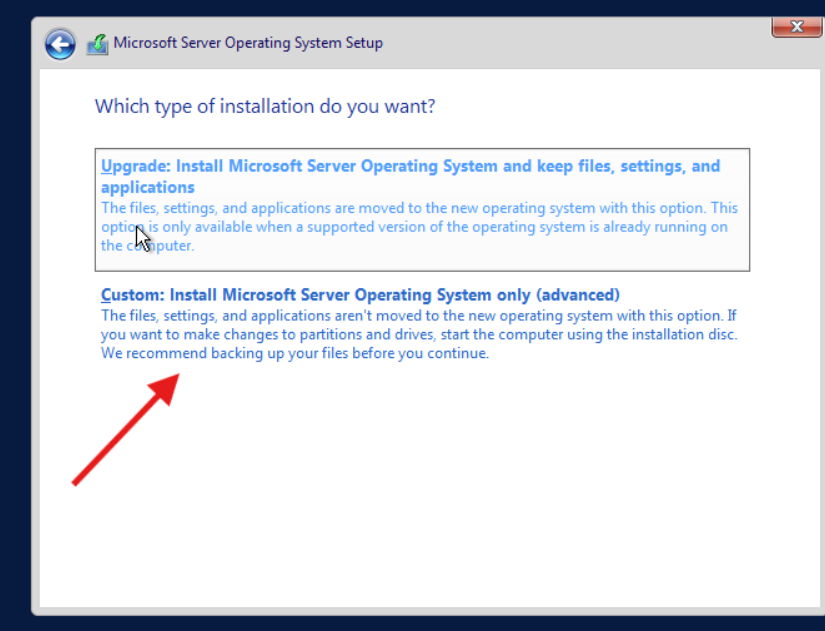
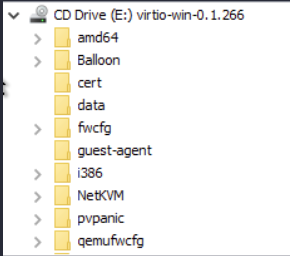
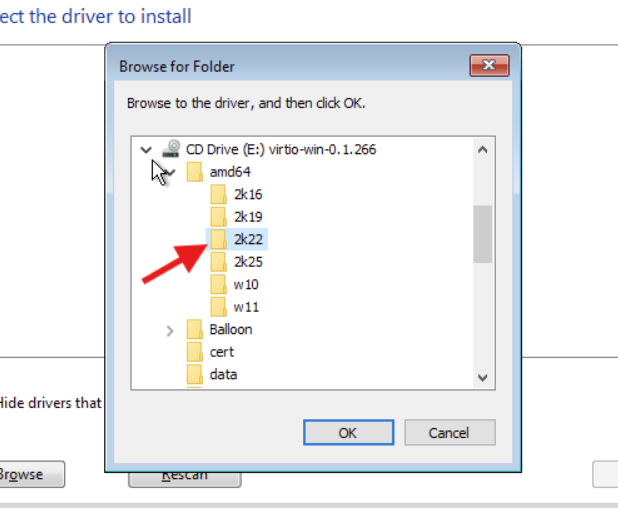
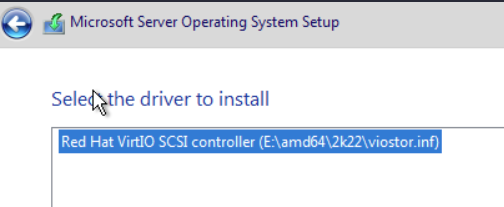
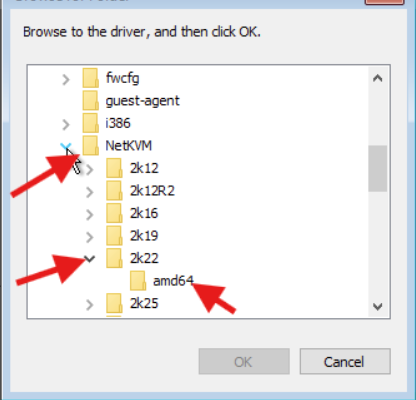
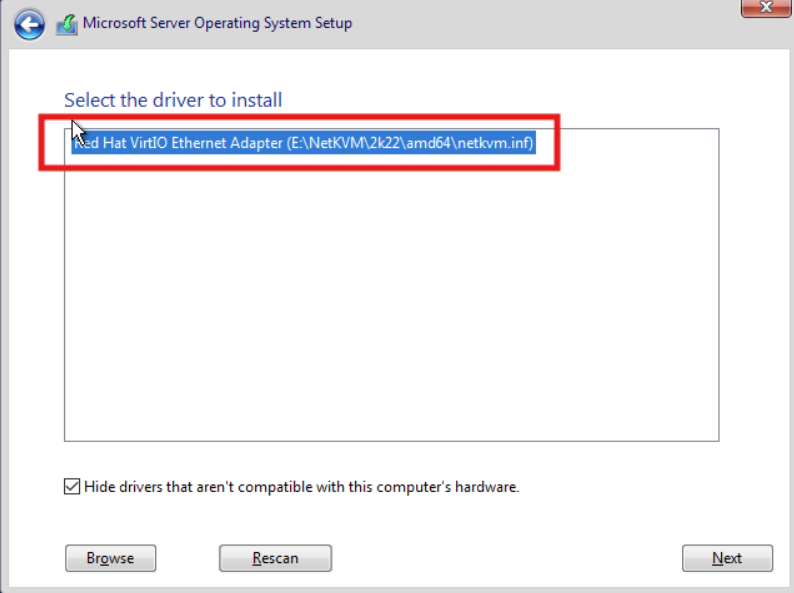
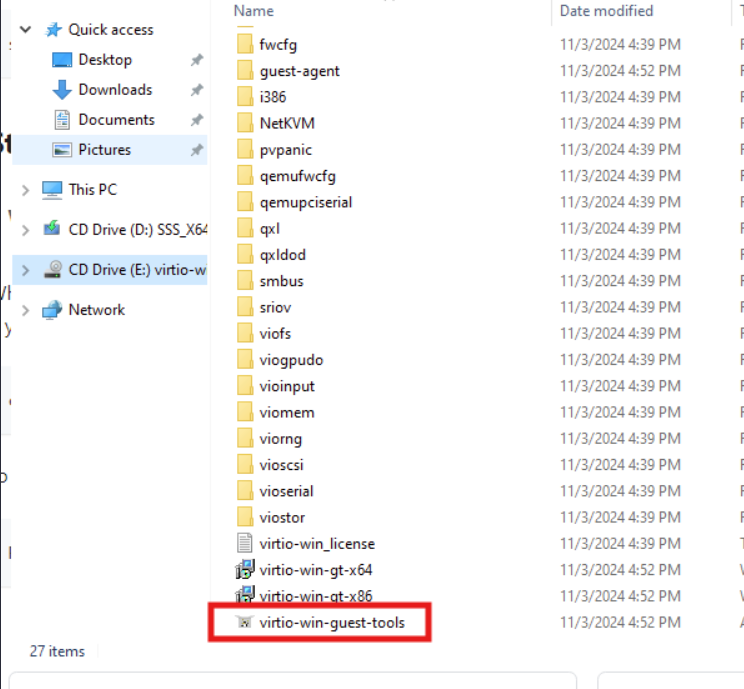
Creating a Palworld server in TrueNAS VMs I wanted to write this out in case anyone else came across the need for a Windows Server install and couldn't find a resource for it. I pieced this together from several guides and just pushing buttons. Create the virtual disk Navigate to the TrueNAS admin page Navigate to Datasets Click Add Zvol Insert the Name, Comments (optional), and Size Navigate to Network Click Add Create a bridge for the VM to use (images to come later) In Bridge Members select your interface (eno1). Navigate to virtualization Pre-req: have your ISO loaded into a store that libvirt-qemu has full access to NOTE: If you don't allow this to have full access the VM creation will fail as it needs the ISO access to install the guest operating system. Have the virtio drivers needed to show up the disk to install in Windows. The drivers can be found here: https://github.com/virtio-win/virtio-win-pkg-scripts/blob/master/README.md - the stable build. Configure the VM with the following options: Leave Enable Display checked so you can login to it via Spice - it will not have networking when it starts. I gave it 2 cores, 4 threads because everything I could find on the internet said it needed that, and 32 GiB of RAM with 16 GiB as the minimum. Select the disk you created Select the bridge you created Select your installation media -we will add the VirtIO ISO later. I left Ensure Display Device checked - was unsure if needed it or not but left it there. Before booting click on the VM and select Devices Select Add in the top right corner and add a CD-ROM device and set the device order to lower than everything else (1003 for me). Boot the machine and connect with Spice. NOTE: If you miss the prompt to boot from CD you will have this screen here: Simply type Exit and it will drop you into a BIOs page. Select reset and then press your keyboard to boot from CD Navigate through startup until you get to disk selection, select Install Windows Only. You will notice on the next screen it cannot detect a disk - this is where the virtIO ISO comes into play. Steps below. Let it do it's initial setup of what it thinks you need. You will need to be selective otherwise it will hang. Below are the drivers I chose to install: Click Browse on the next screen Find your virtIO ISO and expand it. Expand amd64 and select 2k22 from the options. The listed driver should appear there now: Install the driver and the disk will appear. Next, we will install the network driver as well. Same steps as before, Load driver, navigate to the ISO, then select this option: All other drivers we can install with the guest tools from the ISO inside of the guest OS. Continue with the Windows installer. Select the empty disk for it to install it's files to. Once booted into the OS follow these steps: Navigate to the CD that has your virtIO ISO on it and double click on this file: Let it run. It will take a LONG TIME to install everything and will require you to interact with it somewhat. Reboot the server (Other:Unplanned) Install the Palworld dedicated server via SteamCMD located here: https://docs.palworldgame.com/getting-started/deploy-dedicated-server/ I hope this helps anyone else that might have been struggling with it. Massive shoutout to @Mobius for pointing out all my images were broken on my first post - finally figured it out!
- 1 reply
-
- 3
-

-