Leaderboard


Popular Content
Showing content with the highest reputation on 01/09/25 in Posts
-
Right now the team is entirely focused on bug fixes, QoL updates, and pool customization. When we go to shift focus onto our next major feature, we will also select another app for curation (maybe a few). We specifically started with Plex because it’s honestly A) one of the most popular and B) one of the most demanding for configuration. By starting with the hard stuff, we can really focus on honing in support and getting that experience just perfect as well as set a template for all future apps to come. As an example of this, we are very focused on improving the plex experience already. There are issues with remote access, resource assignment, and GPU-assisted transcoding. So those types of things will likely be addressed (at least in part) before we add another curated app. That being said, I am hopeful to really start cranking on a wider App Library sooner than later. Apps are one of the most important features of the product.6 points
-
We are in phase 1 for apps right now, which means we are curating them by hand. Phase 2 will bring in additional community developers to help further curate. Phase 3 is offering the ability for users to load custom docker containers outside our curation.4 points
-
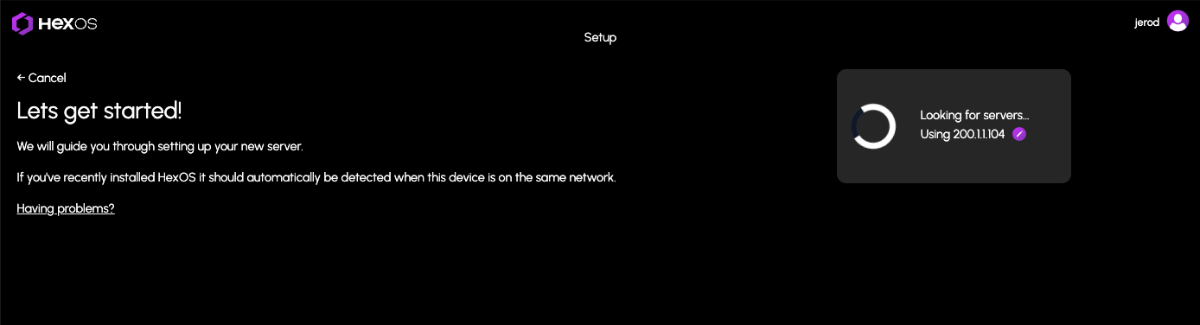
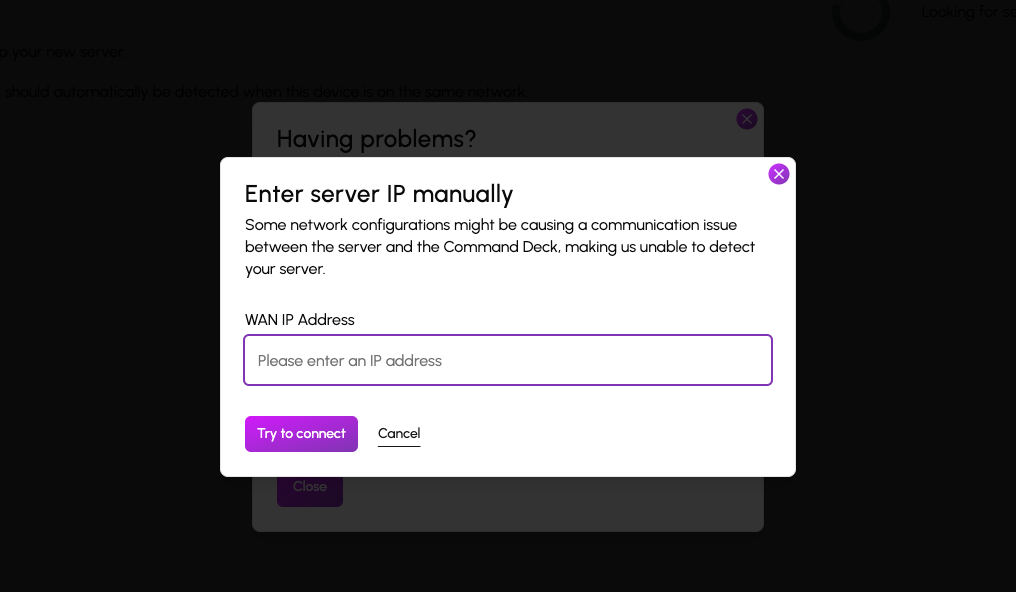
Command Deck Update Notification (01/08/2025) We are releasing an update today. You will automatically receive these changes on your next visit to the Command Deck. For users who are actively connected, please note there may be a brief downtime of minute or two. This update includes an important feature for users who have previously encountered issues claiming their HexOS server due to certain network configurations. These configurations caused communication problems between the server and the Command Deck, preventing automatic server detection after installation due to an IP mismatch. Manual WAN IP Specification You can now manually specify the WAN IP address to assist in the server discovery process when claiming your server. Additionally, we’ve made several minor improvements, including: Additional confirmations for destructive actions to help avoid accidental operations Improved grammar and spelling throughout Clearer instructions for accessing the TrueNAS UI from Settings Better logging to help dev/user experience If you encounter any issues, try clearing your cache first to be sure you are using the latest version: Instructions for clearing your cache
 2 points
 -
Hi there, There is nothing you need to do to receive the update. We've updated the command deck and you automatically receive the latest by logging in. In the future, we will have full OS updates that require a download to your local server, but we haven't reached that point yet. When we do, we'll add an update mechanism to the settings page.2 points
-
You'll notice a new navigation link at the top on the Hub for "Status." We've deployed UptimeRobot to keep track of our online services and the new status page can be found at https://status.hexos.com.1 point
-
I think that's a great idea starting with plex since it's so popular and complex, even if I have no intention of using it. lol but I then am curious what was the reasoning behind immich? Was that super easy? I'm thinking If Immich is super easy it must've been the first one, and then yous went after plex for reasons stated. Got to walk before you can run.1 point
-
LOL notice how they are on TV dinner stands, once i get my half rack in it should be better1 point
-
Yes I believe we have this ability. I’ll look into it!1 point
-
I like it! Tagging @Mawson & @jonp fr visibility. Thanks @WhyCheese!!1 point
-
Atm its not doing anything. Since I got this going I have not had the time to set it up inside of truenas. Once I do it will be on plex now that I will be ripping most of my movie collection, I have another box that will host my 1080TI and a p104-100 on proxmox for my VM's1 point
-
This is our first update yes. Doubt we will have another this week unless it’s a hotfix.1 point
-
Had already installed the HA app through truenas and ran into countless issues, it was unusable! plus had been so long since i'd not be running bare metal / HA OS that i completely forgot about the lack of Add ons and other key features, which was a another blocker. Thus what would be amazing is a 'One-Click' option for Home Assistant BUT the option to install either as: VM (HA OS) App (Container) That way, users have the choice, and could be presented with the pro's / con's of both up front!1 point
-
Hello, If there is one thing I really miss in TrueNAS that is available in QNAP, it is the QFile app in iOS and Android and a Webfiler. It gives the ability to manage most files and folder on the NAS locally so anly the command pass over the network. There are several solutions to manage files and folders within one dataset but that is not what is needed. I hope HexOS can provide something similar to QNAP and Synology. If it is a limitation of ZFS we will have to learn to life with it. Kind regards. Marcus1 point
-
To be clear. Edge is the superior browser. Please submit all feedback below. 👇👇👇 🗑️🗑️🗑️
1 point
-
When you setup hexos, you are forced to wipe all data. There should be an advanced mode to keep as is. If ever your OS drive(say nvme) dies and the OS needs to be reinstalled, I don't want to lose all my data that's already setup in raidz xyz Forcing the user to wipe all drives is a disaster waiting to happen1 point
-
Seafile and Homebridge1 point
-
There's a link in this post:1 point
-
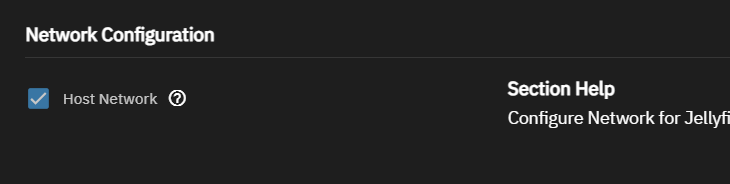
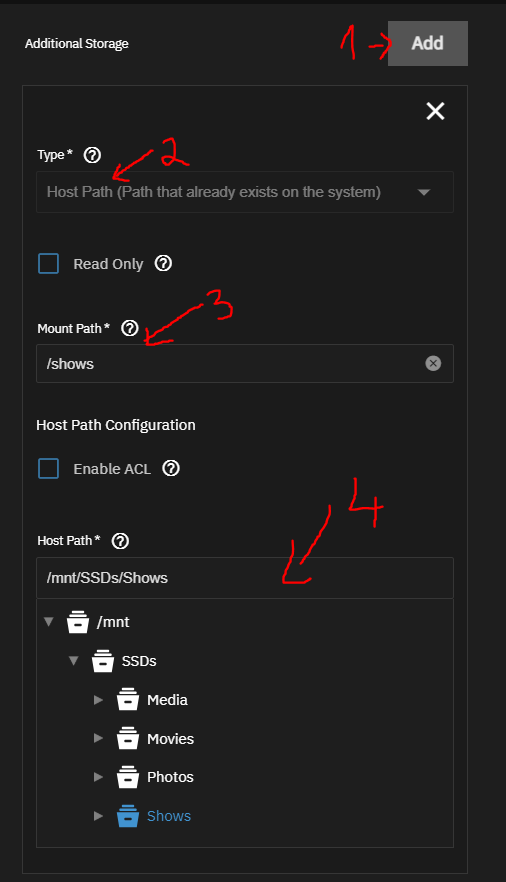
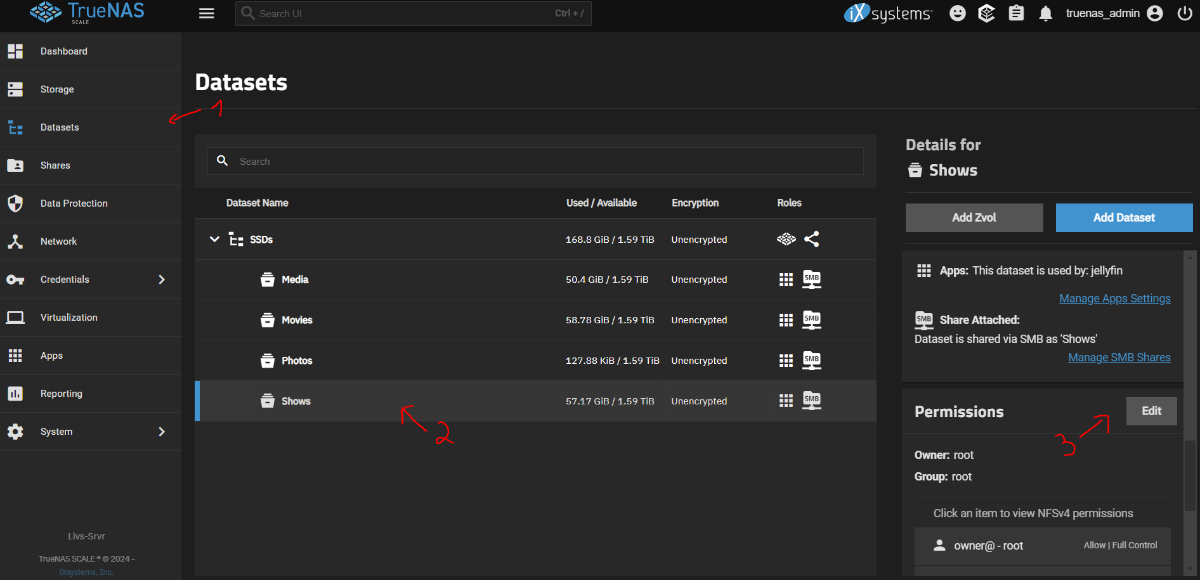
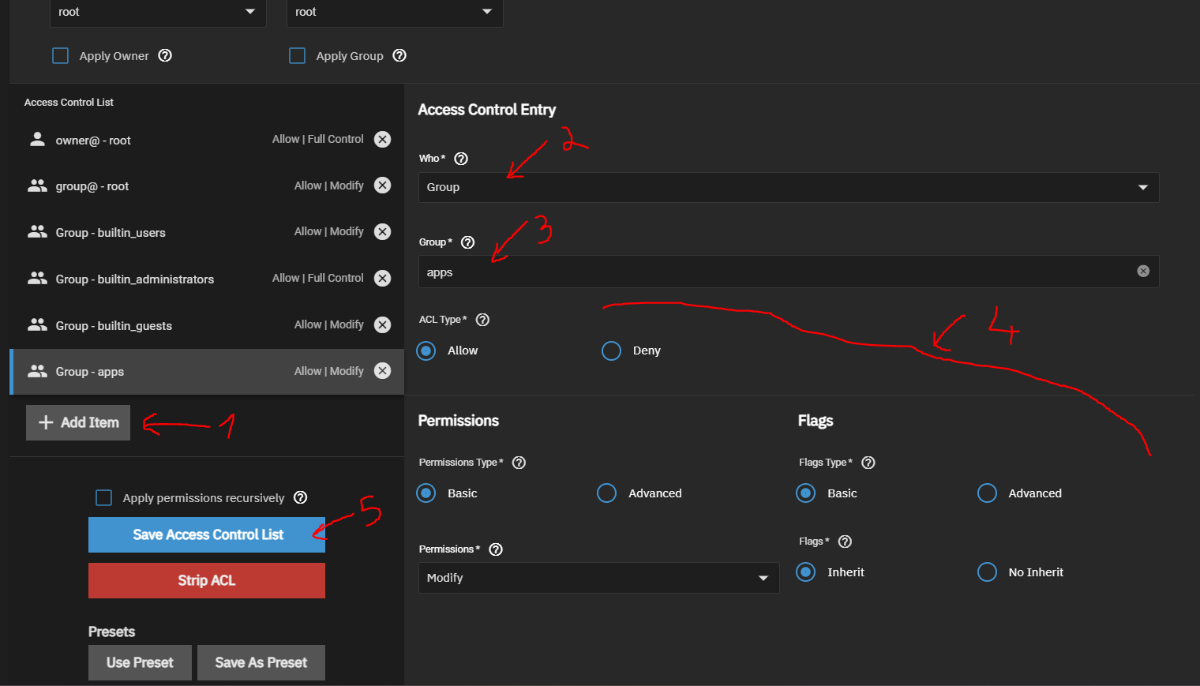
also, a quick tutorial how i set up Jellyfin: Create a public folder in HexOS Go to apps in HexOS, go to Jellyfin, and click Install. It will open TrueNAS UI. user is truenas_admin and password is the HexOS password. (If it sends you to TrueNAS dashboard, go back to HexOS, Jellyfin, and click on Install again) Under Network Configuration check Host Network Under Additional Storage, click Add, choose Host Path, in Mount Path is how the folder will look in jellyfin, in Host Path find the folder you created in HexOS. Thats it for the settings, click Install at the bottom Now in TrueNAS UI go to Datasets, click on the folder created in HexOS, scroll down to Permissions, and click Edit Click Add Item, Who: Group, Group: apps. (you need to scroll at the end once or twice to be able to see full list, then find apps, should be near the end, its not in alphabetical order). Set permissions like in the picture, then click Save Access Control List. Thats it for folder permissions. Go to Apps, jellyfin, and click on Web UI. Then from there set up Jellyfin as normal, when u click on +Folders you should be able to see the folder you added in Host Path, /shows in my case. Thats it, jellyfin should work as normal now, just as if you set it up on your windows machine.
1 point
-
This image. It spark a primal fear deep within my very being. If there is a god. They have definitely forsaken this image. Sins have been commited that generations will speak of, stories will be told and folklore spread through eons. Of the one who has eyes, but does not see, who has ears but does not hear and has knowledge, but does not know. May there be mercy on those weary souls who stumble upon this sight.1 point
-
UPDATE: As of 4/17/26, we have updated the ISO installer to run on version 25.10.3 of TrueNAS SCALE. Existing users should NOT reinstall to get this version. You can update from within the Activity card on the Dashboard (or the Notification). Hello and thank you for joining the HexOS beta program! You are an elite and vital part of this project and your participation is greatly appreciated. This post contains all the information you will need to get started with HexOS and how to communicate with our team during your beta experience. Disclaimer Beta Products, Software, and any related Services are still in development, and therefore, you are advised to safeguard important data, to use caution, and not to rely in any way on the correct functioning or performance of the products, software, or any related services. Beta Products and Services are provided to you “AS IS”, without any warranty whatsoever. Expectations During your participation in the beta, we expect you to do the obvious: use and test the software. But we also expect you to communicate with us when things don’t go right or if you’re having trouble. Please post feedback and let us know about your experiences, good and bad. That being said, please remember that this is beta software and early access. HexOS has a long and healthy roadmap ahead. Quickstart Guide For those that just want to get started, here’s the TLDR: Download the ISO here: https://downloads.hexos.com/TrueNAS-SCALE-25.10.3-HexOS.iso or https://hexos-downloads.sfo3.cdn.digitaloceanspaces.com/TrueNAS-SCALE-25.10.3-HexOS.iso (SHA256 Checksum: e551911445c95c1943e6638091896f34d2d423900cccd688ac09d811e78ed450) Use a tool such as Balena Etcher to image a USB flash device with the ISO. Boot your server from the flash device and install the OS to preferably an SSD. When given the option, opt to create the admin password in the installer (do not select the option to "Configure using WebUI"). Remove the flash device and reboot your server when the install is complete. From another device (mobile, tablet, desktop) that is on the same LAN as your server, login to https://deck.hexos.com using your HexOS credentials. Follow the instructions to complete your server configuration. NOTE: As of the 24.10.2.2 build of this ISO, configuring the admin password via the webUI option has been removed from the installer. However, if you select to create an admin password, but then attempt to "cancel" that process, the ISO will proceed with an installation with no admin password set. This is a known bug and the TrueNAS team will be addressing this in a future update to the ISO. Just don't cancel out of creating the admin password in the installer ;-). Hardware Requirements Booting HexOS is designed to support a wide variety of x86 hardware (Intel or AMD). The minimum requirements are a 2-core 64-bit CPU, 8GB of memory, and a 16GB or larger SSD boot device. However, depending on your needs for performance and applications, more resources may be required. Storage Pools Pools are made up of storage devices based on size and type (HDDs vs. SSDs). Storage devices in each pool need to be roughly the same size*. The OS boot device cannot be a part of a pool. Expandable pools require a minimum of 3 devices and can be grown one device at a time. Non-expandable pools can be created with 2 devices. Initial pool width should not exceed 8 devices. Maximum expanded pool width should not exceed 12 devices. At least one storage pool must be created to use HexOS. *In the event of slight variations (e.g. 240GB and 256GB), devices can be grouped, but total capacity for the pool will sacrifice the larger device’s excess storage. Build Recommendations HexOS has been designed so that a relatively modern PC can be easily transformed into a very viable home server. This means using standard HDDs/SSDs and using onboard controllers for storage/networking. However, since we’re based on TrueNAS, our hardware support is actually rather vast. For more detailed hardware recommendations for advanced builds, please refer to the TrueNAS SCALE Hardware Guide. Installing in a VM As HexOS is based on TrueNAS SCALE, it can be installed as a virtual machine as well. While the process should be fairly self-explanatory, please see the TrueNAS SCALE documentation for additional instructions on VM installation. Setup and Configuration Once the OS has been installed and rebooted, you will use a web browser on the same network as your server to register your system and complete the setup process. This can be a PC, tablet, or mobile device. Using a capable browser, login to https://deck.hexos.com. Beta 1 Features Our first release is focused on providing a streamlined user experience for setup and configuration and laying the framework for what’s to come. The main features of Beta 1 include: Setup and configuration wizard Configure your home server in minutes with ease. Analyze system health, with warnings for SMR HDDs. Auto-configure storage pools to safeguard against device failures. Securely manage your server remotely via Command Deck. Storage device management Detect error states and conditions and report through the dashboard Highlight individual storage devices and their respective faults Replace devices from storage pools due to failure or preventative maintenance Expand pools as little as one device at a time Folders and users Create and share folders over your local network. Easily manage permissions for secure access. Apps One-click deploy Immich as a personal photo library app. One-click deploy Plex as a home media server. Automatic folder creation for app storage. Dashboard / UI Access key statistics like CPU, memory, network, and storage usage at a glance. Monitor storage health and see alerts for errors or degraded pools. Manage multiple servers from a single, unified interface. Enjoy mobile-responsive design for effortless navigation on any device.1 point
-
Damn it, I also did not read the requirement for 2x drives before purchasing the hexos license. My pocket NAS only accept M.2 and with one spare 2tb installed meaning I now need another M.2 with 2TB capacity which are not cheap. I will only be using this as low power always on plex server and so I don't care about redundancy etc. I can rip the movies back on if the drive fails.1 point
-
Minecraft server hosting 😁1 point
-
I get the same error. The Learn more leads to a dead link: https://www.hexos.com/selecting-drives1 point
-
I was able to finish the install, but I can't create storage pools without 2 spare disks.1 point