Leaderboard


Popular Content
Showing content with the highest reputation on 09/28/25 in Posts
-
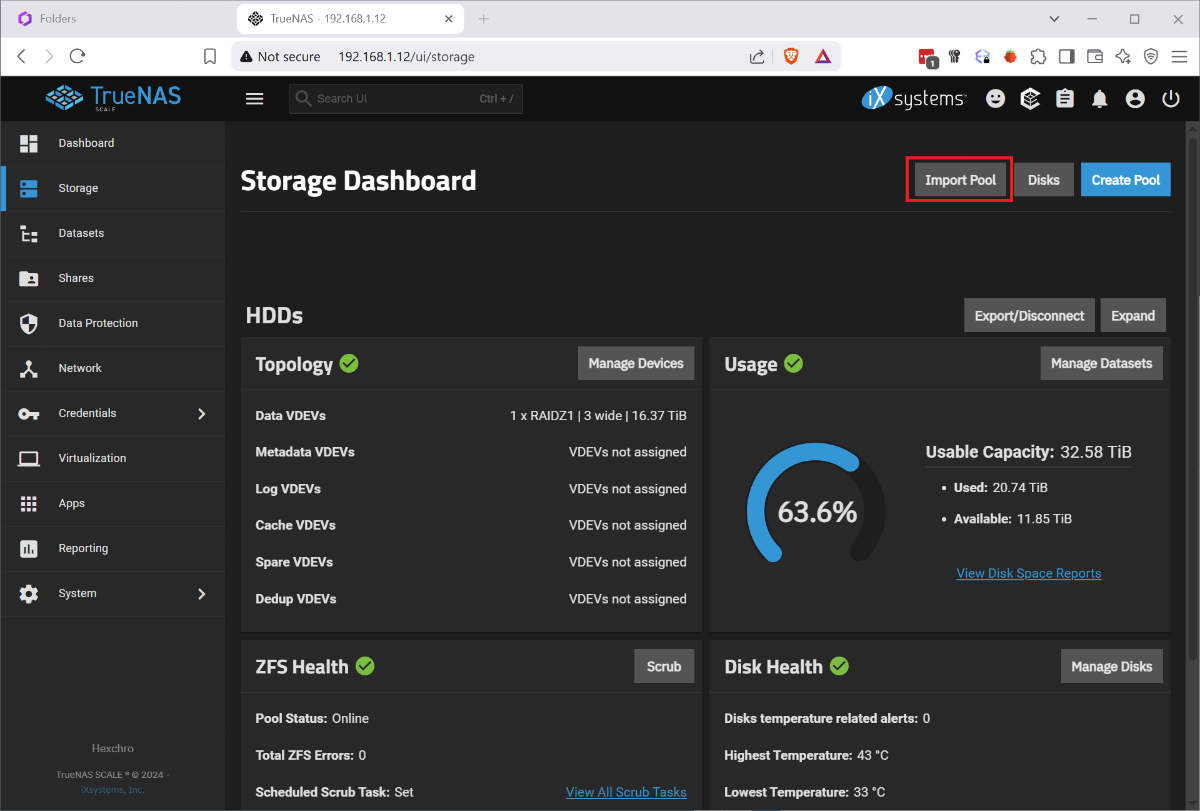
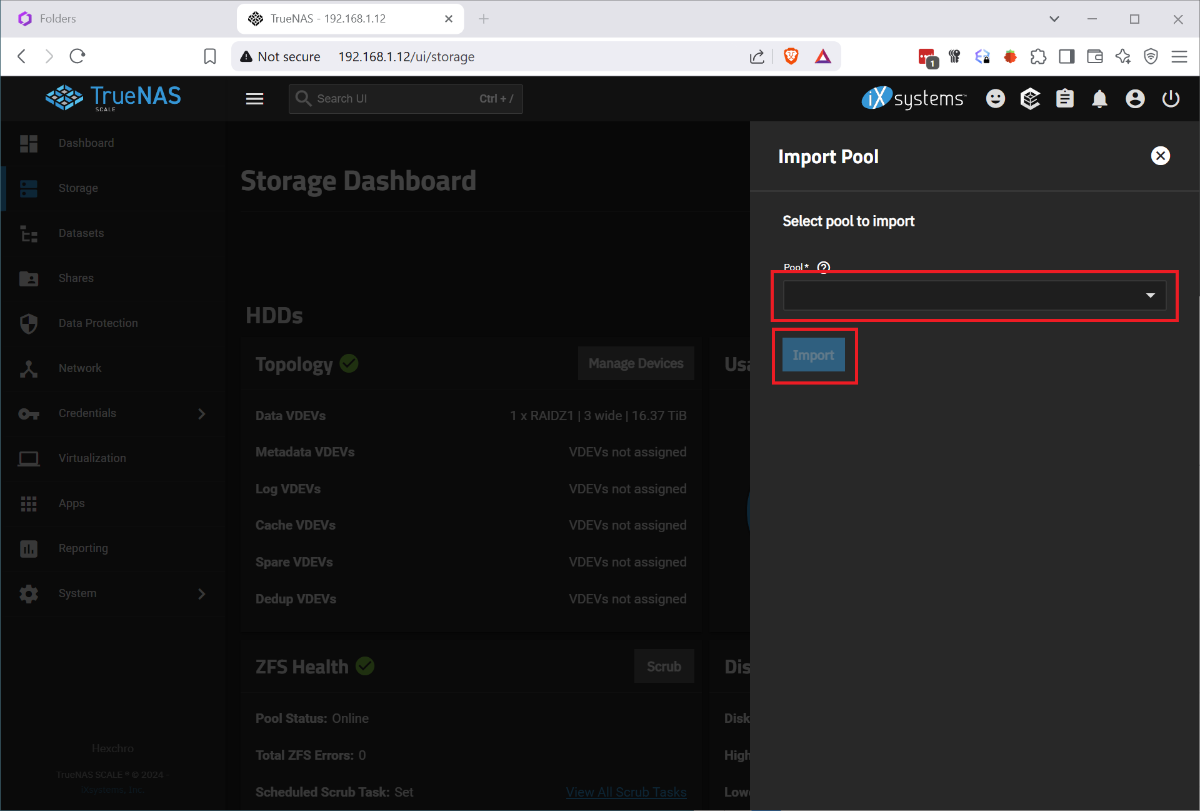
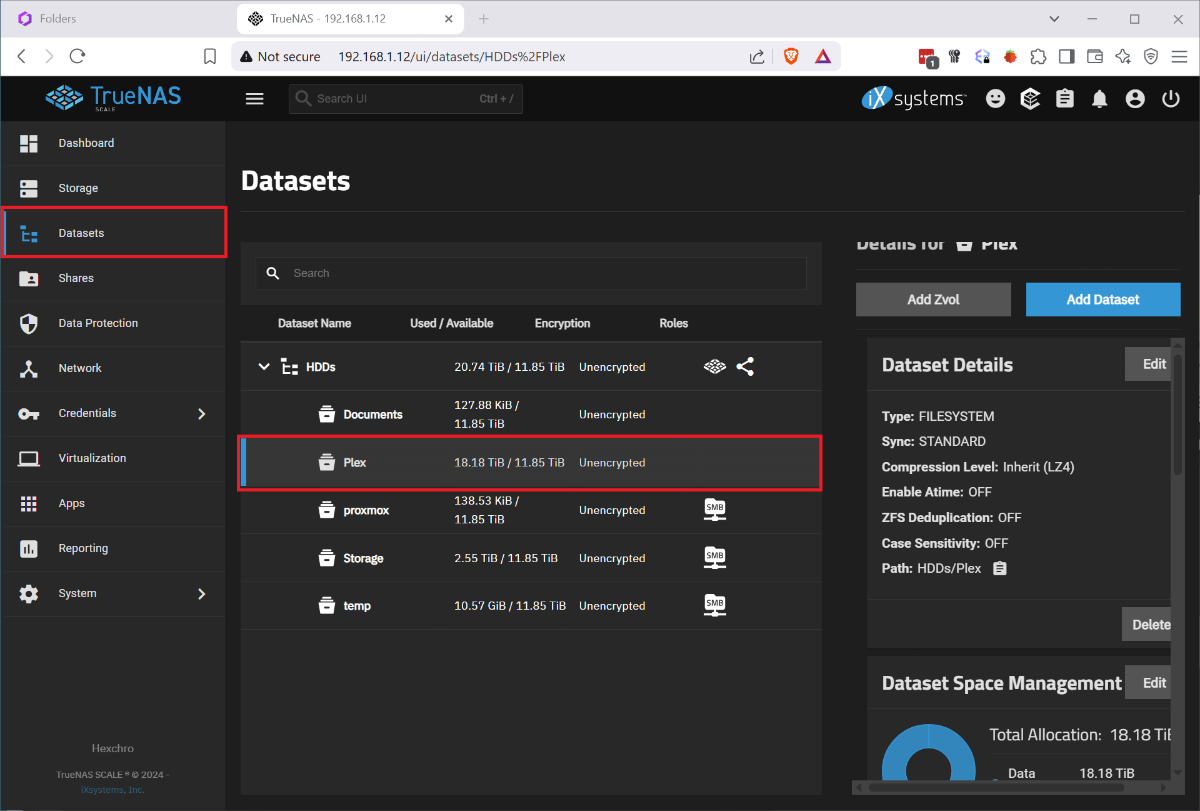
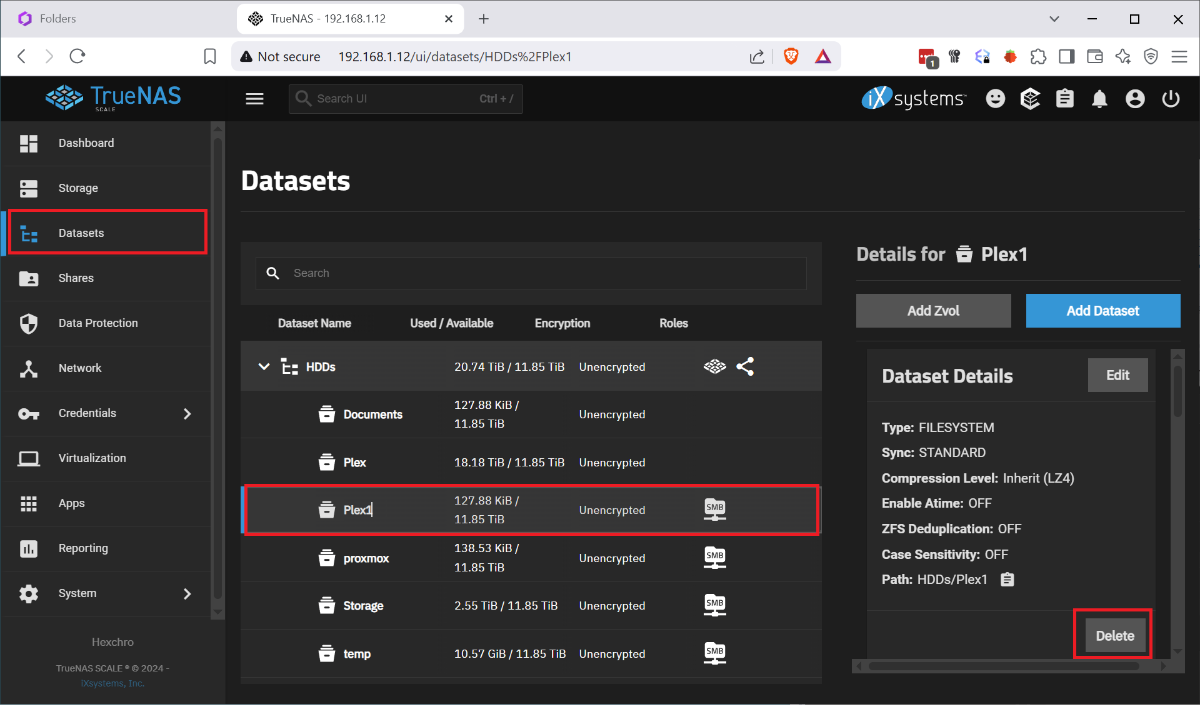
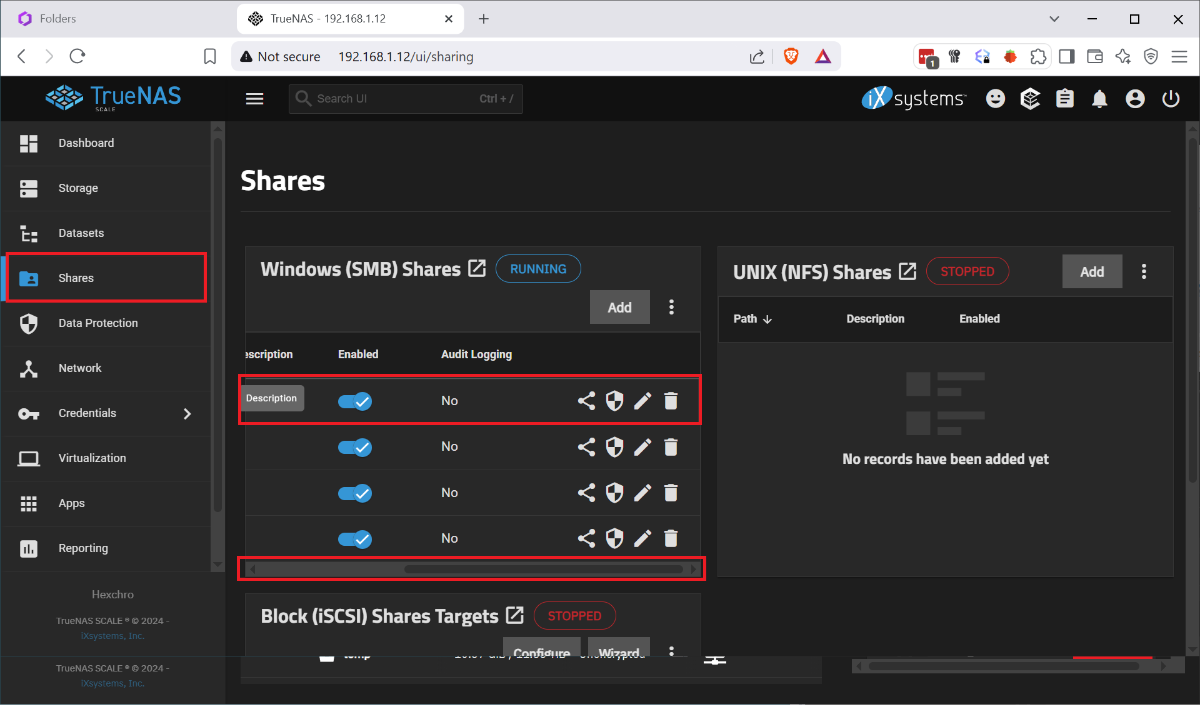
I ran into the issue that my boot drive was corrupted and I had to restore my HexOS install from scratch. I found posts that said basically just reinstall it but nothing that explained the process. I had several issues, when I reinstalled HexOS it wanted to wipe my raid, once i disconnected the raid and went through the initial setup, I had no shares. So I wanted to document this so that others with this issue find a solution instead trying to rename and recreate shares and move data between datasets. This was done after I figured out a process for doing this so sorry if I missed any steps. Step 1. Remove the bad boot drive. Step 2: Disconnect the Raid drives. Step 3: Install your new boot drive and usb HexOS install media. Step 4: Follow the standard install process, including setting your admin account and claiming your server. When you finish the setup you will not have any disks so you will name your server and just continue. Step 5: Shutdown the system. Step 6: Reconnect your raid drives and boot up. Step 7: Log in to the TrueNAS gui by going to the IP address of your server in the browser and using the credentials you set up during install Username: truenas_admin Password: <whatever you entered at install>. Step 8: Go to Storage Tab and select Import Pool. 9: Select your pool from the drop down it should be named 'HDDs' and select Import. It will take a few minutes to import and complete. At this point the storage should be detected in HexOS and you should be able to start creating shares, but your existing folders and shares will not have returned. To get your shares back you must recreate them by renaming your datasets and naming them back as follows: Step 1: Under Datasets you can find all of your existing data on the RAID. Find the Dataset you want to restore in HEXOS and note the name. Step 2: Back in HexOS go to the Folder tab and select 'New Folder' Note: you may want to recreate your old users manually or create your folders with public access and recreate the users and add permissions later. Step 3: Create a new folder with the same name as the Dataset but add a 1 (In this case 'Plex1'). Make sure to keep the array the same 'HDDs; and give it the permissions you want (this can be adjusted later). Step 4: Back in TrueNAS go to Shares and select the edit button on the 'Plex1' share, depending on screen resolution you may need to scroll the horizontal scroll bar to the right. Step 5: In the side bar remove the '1' from the Path or use the drop down to select the original shared folder, then click into the Name field which should auto update and remove the 1. Step 6 Scroll down and click 'Save' and you will be prompted to restart the SMB service, do this and your share should be updated. Step 7: Navigate to the dataset tab select the 'Plex1' dataset and click delete on the right side. It will make you confirm by typing the whole dataset path. Step 8: When this is done you should be able to refresh the folders tab on the HexOS page and see the updated folder name (it took a minute to refresh for me). Redo this for each share that you wish to recreate. Once I did this and set up the users and permissions correctly, other servers I used to connect to my shares started working seamlessly. I didn't experience this but I can imagine you may run into some permissions issues since the new users in HexOS could have different IDs than before. Unfortunately you would need to manually adjust permissions on the files and folders. P.S. I imagine minutes after posting this someone will tell me I am dumb and should have done it this way, or someone else posted better over here. If that's the case let me know and Ill point to a better example, but when I needed help I couldn't find it.
 1 point
 -
https://www.gingerling.co.uk/swapping-my-to-more-power-efficient-hardware-my-hexos-nas-how-did-it-go/ Hi Gang!! I've been a bit quiet over the summer as I went backpacking with my little kids in Europe. We had an amazing time but I was totally exhausted after. The above is my latest blog. the tldr is I nearly halved my running costs with a change to hardware that wasn't expensive. Honestly the kit is about the same price as what I had already paid for to begin with. Next I will finally get to running this update and be back soon with that story 🙂 Hope you're all having fun!! Anna x1 point
-
Hi, i don't really know if it's possible or if it has been discussed earlier but is it possible for HexOS to display differents pcie cards information (like what card is in what slot) or direcly display the GPU informations like the usage the drivers etc a little like it is done with the cpu informations? I think it could be a great options for those who use gpu for transcoding or in VM... thank you all 😁1 point
-
The Mod team has also reached out for you and hopefully we can get this resolved quickly for you1 point
-
Truenas permissions can get real frustrating. Even understanding them is tough. Hopefully we can avoid the tn ui the further Hexos matures1 point
-
I would like to use HexOS as a sort of app-server (to manage my docker) and not as my primary storage. I already have multiple dedicated separate NAS boxes (Synology and Ubiquiti) that contain my family pictures, linux isos and other data I want my applications to use. Thus, I would like to mount various remote shares on hexOS so I can pass them along to Plex, Immich and other apps. I know (and I did in the past) that I can use the linux shell, create .smbcredentials and edit fstab to mount it, but it would be amazing to have a UI for it in HexOS. Is that something that is will happen in the future? As an explanation for why I don't simply run docker compose on ubuntu - truenas (and hexOS by extension) makes configuring redundant storage much easier - I can simply install truenas/hexOS and have mirrored boot drives and RaidZ1 pool for my appdata/cache/thumbs etc, while on a regular server I would have to do a bunch of shell stuff that I don't care to learn to be frank. To be clear: I am not asking about accessing hexOS-managed drives. I am asking about accessing remote drives from other machines on hexOS and passing them to various apps.1 point
-
I'm not saying it is right for your situation but I have been using Tailscale for remote access to Immich and the NAS storage itself. I picked it because someone did a pretty good install guide and posted it. Again, I;m not saying it the best for you. I can say though that for someone who doesn't know squat about TrueNAS or Linux or Docker containers and the like, I can saw it worked first try. I am curious if anyone wants to volunteer some alternatives. I believe Cloudflare is sprinkled throughout the forum as well as the general concept of reverse proxy and port forwarding.1 point
-
Great write up. I'd do it the same way Steps 1-6 is all that's needed (at this time) to reclaim a disconnected server using the same boot drive for anyone with that problem1 point
-
UPDATE: As of 4/17/26, we have updated the ISO installer to run on version 25.10.3 of TrueNAS SCALE. Existing users should NOT reinstall to get this version. You can update from within the Activity card on the Dashboard (or the Notification). Hello and thank you for joining the HexOS beta program! You are an elite and vital part of this project and your participation is greatly appreciated. This post contains all the information you will need to get started with HexOS and how to communicate with our team during your beta experience. Disclaimer Beta Products, Software, and any related Services are still in development, and therefore, you are advised to safeguard important data, to use caution, and not to rely in any way on the correct functioning or performance of the products, software, or any related services. Beta Products and Services are provided to you “AS IS”, without any warranty whatsoever. Expectations During your participation in the beta, we expect you to do the obvious: use and test the software. But we also expect you to communicate with us when things don’t go right or if you’re having trouble. Please post feedback and let us know about your experiences, good and bad. That being said, please remember that this is beta software and early access. HexOS has a long and healthy roadmap ahead. Quickstart Guide For those that just want to get started, here’s the TLDR: Download the ISO here: https://downloads.hexos.com/TrueNAS-SCALE-25.10.3-HexOS.iso or https://hexos-downloads.sfo3.cdn.digitaloceanspaces.com/TrueNAS-SCALE-25.10.3-HexOS.iso (SHA256 Checksum: e551911445c95c1943e6638091896f34d2d423900cccd688ac09d811e78ed450) Use a tool such as Balena Etcher to image a USB flash device with the ISO. Boot your server from the flash device and install the OS to preferably an SSD. When given the option, opt to create the admin password in the installer (do not select the option to "Configure using WebUI"). Remove the flash device and reboot your server when the install is complete. From another device (mobile, tablet, desktop) that is on the same LAN as your server, login to https://deck.hexos.com using your HexOS credentials. Follow the instructions to complete your server configuration. NOTE: As of the 24.10.2.2 build of this ISO, configuring the admin password via the webUI option has been removed from the installer. However, if you select to create an admin password, but then attempt to "cancel" that process, the ISO will proceed with an installation with no admin password set. This is a known bug and the TrueNAS team will be addressing this in a future update to the ISO. Just don't cancel out of creating the admin password in the installer ;-). Hardware Requirements Booting HexOS is designed to support a wide variety of x86 hardware (Intel or AMD). The minimum requirements are a 2-core 64-bit CPU, 8GB of memory, and a 16GB or larger SSD boot device. However, depending on your needs for performance and applications, more resources may be required. Storage Pools Pools are made up of storage devices based on size and type (HDDs vs. SSDs). Storage devices in each pool need to be roughly the same size*. The OS boot device cannot be a part of a pool. Expandable pools require a minimum of 3 devices and can be grown one device at a time. Non-expandable pools can be created with 2 devices. Initial pool width should not exceed 8 devices. Maximum expanded pool width should not exceed 12 devices. At least one storage pool must be created to use HexOS. *In the event of slight variations (e.g. 240GB and 256GB), devices can be grouped, but total capacity for the pool will sacrifice the larger device’s excess storage. Build Recommendations HexOS has been designed so that a relatively modern PC can be easily transformed into a very viable home server. This means using standard HDDs/SSDs and using onboard controllers for storage/networking. However, since we’re based on TrueNAS, our hardware support is actually rather vast. For more detailed hardware recommendations for advanced builds, please refer to the TrueNAS SCALE Hardware Guide. Installing in a VM As HexOS is based on TrueNAS SCALE, it can be installed as a virtual machine as well. While the process should be fairly self-explanatory, please see the TrueNAS SCALE documentation for additional instructions on VM installation. Setup and Configuration Once the OS has been installed and rebooted, you will use a web browser on the same network as your server to register your system and complete the setup process. This can be a PC, tablet, or mobile device. Using a capable browser, login to https://deck.hexos.com. Beta 1 Features Our first release is focused on providing a streamlined user experience for setup and configuration and laying the framework for what’s to come. The main features of Beta 1 include: Setup and configuration wizard Configure your home server in minutes with ease. Analyze system health, with warnings for SMR HDDs. Auto-configure storage pools to safeguard against device failures. Securely manage your server remotely via Command Deck. Storage device management Detect error states and conditions and report through the dashboard Highlight individual storage devices and their respective faults Replace devices from storage pools due to failure or preventative maintenance Expand pools as little as one device at a time Folders and users Create and share folders over your local network. Easily manage permissions for secure access. Apps One-click deploy Immich as a personal photo library app. One-click deploy Plex as a home media server. Automatic folder creation for app storage. Dashboard / UI Access key statistics like CPU, memory, network, and storage usage at a glance. Monitor storage health and see alerts for errors or degraded pools. Manage multiple servers from a single, unified interface. Enjoy mobile-responsive design for effortless navigation on any device.1 point
-
For detailed installation instructions, please refer to this thread: Illustrated Installation Guide - START HERE! =)1 point
-
Agreed. When creating a VPN connection, have options to route specific apps with this connection, or the whole system, or whole system but exclude specific apps.1 point